WireGuard Part 5: Introduction to Netmaker - A Platform for Creating and Managing WireGuard Networks
This article was last updated on: February 7, 2024 pm
Synopsis of the series:
- WireGuard article series (1): What is a VPN?
- WireGuard Part 2: Introduction to WireGuard - Fast, Modern, Secure VPN Tunnels
- WireGuard Part 3: WireGuard Installation
- WireGuard article series (4): WireGuard is quick to get started
Netmaker is a platform that uses WireGuard to create and manage fast, secure, and dynamic virtual overlay networks.
About Netmaker
What is Netmaker?
Netmaker is a tool for creating and managing virtual overlay networks. If you have at least two machines with internet access and you need to connect to a secure tunnel, Netmaker will serve you. If you have thousands of servers spread across multiple locations, data centers, or the cloud, Netmaker is for you. No matter where machines are, Netmaker can securely connect them.
Netmaker uses these machines and creates a flat network so they can easily and securely talk to each other. If you’re familiar with AWS, it’s like a VPC, but it’s made up of arbitrary computers. From a machine perspective, all these other machines are in the same neighborhood, even though they are distributed all over the world.
What sets Netmaker apart is its speed and flexibility. Netmaker is faster because it uses the kernel WireGuard. It’s more dynamic because the server and agent are fully configurable, which allows you to handle a variety of different use cases.
How do I use Netmaker?
Rely on WireGuard to create channels between machines. At its core, Netmaker manages WireGuards across machines to create reasonable networks. Technically, Netmaker is two things:
- Management server, called Netmaker
- Agent, called Netclient
As a network management server, you interact with the server to create and manage networks and devices. The server holds the configuration of these networks and devices, which can be retrieved by netclients (agent).
Netclient is installed on any machine you want to add to a given network, whether that machine is a virtual machine, server, or IoT device. Netclient contacts the server, which tells it how to configure the network. By doing these operations simultaneously on many machines, we create a dynamic, fully configurable virtual network.
Netmaker servers typically do not route traffic. Otherwise, it would be a hub-and-spoke model, which is very slow. Instead, Netmaker simply tells machines on the network how they can reach each other directly. This is calledFull mesh network, much faster. Even if the server goes down, your network will still function as long as the existing machines have not changed substantially.
🧠 remark:
Netmaker is to WireGuard what Istio is to Envoy.
Netmaker is the control plane that helps you create, manage, and control all of Wireguard’s complex network configurations.
WireGuard is the data plane responsible for the specific routing of network traffic.
And that’s why we decided to use Netmaker: to help us manage WireGuard configurations, freeing us from complex WireGuard configurations.
Netmaker architecture
Netmaker core concepts
WireGuard
I don’t need to go into too much detail. This is the real core of the work.
Mesh networking
i.e. Full mesh:

For more details, see:Full mesh
Mesh networks are generally faster than other topologies, but they are also more complex to set up. WireGuard itself provides a way to create an encrypted tunnel between devices, but it does not provide a way to establish a complete network. That’s where Netmaker comes in.
Netmaker
Netmaker is a WireGuard-based platform that allows users to create mesh networks between their devices. Netmaker can be created based on use cases completely and Partial mesh network。
Netmaker does a lot of work to set up the configuration for you so you don’t have to. This includes things like WireGuard ports, endpoints, public IPs, keys, and peers. Netmaker’s job is to abstract network management as much as possible, so that you can simply click Create Network and click Add Machine to Network to create the network. That is, each machine (node) is different and may require special configuration. That’s why Netmaker sets practical default settings, and everything in Netmaker is fully configurable.
Node
The machines in the Netmaker network that are managed by Netclient are called Node, as you’ll see in the UI. A Node can be a virtual machine, a bare metal server, a desktop computer, an IoT device, or any other internet-connected machine with NetClient installed. A node is simply an endpoint in the network that can send traffic to and receive traffic from all other nodes.
🧠 remark:
Netmaker’s node is WireGuard’s peer/node/device, but on this node, in addition to the wireguard, there will also be a netclient installed.
SystemD
It is the common SystemD in Linux systems.
Netmaker’s netclient (the agent that controls networking on all nodes) can run as a CLI or system daemon. On Linux, it runs as a daemon by default, which requires systemd. As Netmaker grows, systemd will be one of the possible service management options, allowing NetClient to run on a wider range of devices. However, for now, netclient should run “unmanaged” (netclient join-daemon=off), some other methods can be used like cron jobs or custom scripts.
🧠 remark:
For example, my NAS does not have SystemD, so I need it netclient join-daemon=off, you also need to configure crontab for timing checkin。
In version 0.8, both Mac and Windows are supported. On these operating systems, netclient uses LaunchD and windowsservice to start daemons, respectively, instead of SystemD.
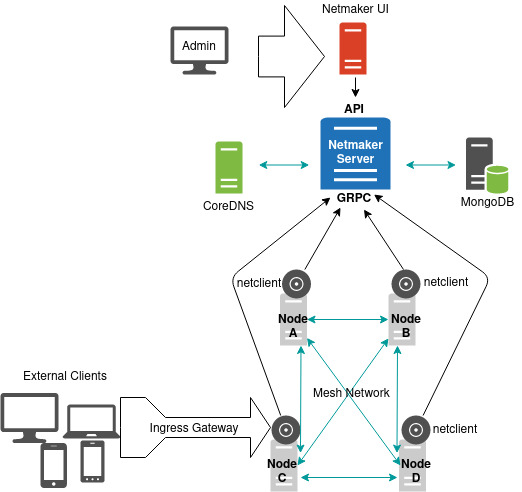
Netmaker components
Netmaker Server
At the heart of the Netmaker server is a golang binary. The source code can be found in GitHub found on. The binaries themselves compile for most systems. If you need to run Netmaker Server on a specific system, then it will most likely work. In a typical deployment, it runs as a Docker container. It can also run as a systemd service.
The Netmaker server acts as the front-end API and the GRPC server for the computers in the network. GRPCs are faster and more efficient than standard API calls, which increases the speed of transactions. For this reason, the Netmaker server exposes two ports: the default port for the API is 8081, and the default port for GRPC is 50051.
Netmaker network modes include client mode and DNS mode. Either of these two can be disabled, but it is enabled by default. Client mode allows you to treat the Netmaker host (operating system) as a network node, install Netclient, and control the host network. DNS mode has server write configuration settings for coreddns, which is a separate component, and nameserver, which selects configuration settings to manage node DNS.
Netmaker Server interacts with SQLite (default), Postgres, or SQLite as a distributed version of its database. This DB holds information about nodes, networks, users, and other important data. This data is configuration data. In most cases, Netmaker provides configuration data to Nodes, telling them how they should configure themselves. Netclient is the agent that actually performs the configuration.
Netclient
At its core, Netclient is a golang binary. The source code can be found in Netmaker GitHub Repository’s netclient folder found. The binaries themselves compile for most systems. However, this binary is designed to manage a certain number of operating systems. Starting with version 0.8, netclient can run as a system daemon using systemd on Linux distributions, or as an “unmanaged” client on non-systemd distributions. Netclient for Windows and Mac will run as a Windows service or LaunchDaemon, respectively.
Netclient is installed through a simple bash script that extracts the latest binaries and runs them register and join Command.
The command adds a WireGuard tunnel directly to the netmaker server for all subsequent communication.
join The command attempts to add a machine to the Netmaker network with reasonable default values, which can be overridden with configuration files or environment variables. Assuming NetClient has a valid key (or the network allows nodes to be registered manually), it will be registered with the Netmaker network and return the necessary configuration details on how to set up its local network.
Netclient then sets up the system daemon (if running in daemon mode) and configures WireGuard. So first of all Install Wireguard。
If running in daemon mode, netclient executes periodically check in (check-in or check-in). It will authenticate with the server and check for any changes in the network. If anything, it also publishes changes to its own local configuration. If a change occurs, the server returns to the new configuration and netclient reconfigures the network. If not running in daemon mode, the check-in is performed manually by the operator (netclient checkin-n <network name>)。
The check-in process allows Netmaker to create dynamic mesh networks. When nodes are added, removed, and modified on the network, other nodes are notified and appropriate changes are made.
Database (sqlite, rsqlite, postgres)
In v0.8, Netmaker defaults to sqlite as the database. It can also use PostgreSQL or rsqlite, a distributed (RAFT consensus) database. Netmaker interacts with this database to store and retrieve information about nodes, networks, and users.
For special use cases, additional database support (in addition to SQLite and RSQlite) is very easy to implement. Netmaker is simple to useKey valueLookups run the network, and databases are designed to be extensible, so key-value stores and other SQL-based databases can be supported by changing individual files.
Netmaker UI
Netmaker UI is a static website based on reactjs that can run on a standard web server, such as Nginx or Caddy. The source code can be found in Over here Found it. In a typical configuration, Netmaker UI runs on Caddy as a Docker container.
🧠 remark:
Caddy is a new popular go-based web server, automated (such as automatically requesting and configuring SSL certificates), simple, easy to use, dig a hole here, and later have time to fill in the introduction article of Caddy.
Netmaker can be fully used without a user interface, but the user interface makes it easier for most users to use. It has a sound process and layout for managing networks, nodes, access keys, and DNS.
CoreDNS
Netmaker allows users to provide and manage private DNS for their nodes. This requires a nameserver, and coredns is selected as the nameserver. CoreDNS is lightweight and extensible. coredns loads DNS settings from a simple file managed by Netmaker and provides DNS information to managed nodes. DNS can be complex, and only a few devices currently support DNS management, especially those running systemd-resolved. However, Netmaker CoreDNS instances can be manually added to other devices as nameservers. DNS mode can also be turned off.
External Client External client
An external client is simply a manually configured WireGuard connection to your network, which Netmaker helps manage.
Most machines can run WireGuard. Establishing a WireGuard connection to a single endpoint is fairly straightforward. But setting up mesh networks and other topologies like site-to-site becomes complex.
Mac, Windows, and Linux are handled directly by Netclient.
Netmaker can issue “external clients” to handle any device that is currently incompatible with NetClient, including iPhone, Android, and some Unix distributions. Over time, this list will be removed and may not even require an external client.
External clients connect to the Netmaker network through an “Ingress Gateway” (simply understood as WireGuard’s relay server), which is configured for a given node to allow traffic to flow into the network.
Netmaker technology process
Here’s a high-level, step-by-step overview of the Netmaker internal communications process (assuming Netmaker is already installed):
- The administrator creates a new network with a subnet, such as 10.10.10.0/24
- The administrator creates an access key that registers the new node
- Both requests are routed to the server through API calls in the front end
- The administrator runs the netclient installation script on any given node (machine).
- Netclient decodes the key, which contains the GRPC server location and port
- Netclient uses the information to register and connect to the WireGuard channel of the GRPC server
- Netclient retrieves/sets up local information, including open ports for WireGuard, public IPs, and generating key pairs for peers
- Netclient provides this information to the GRPC server for authentication through an access key.
- The Netmaker server validates the information and creates nodes, setting default values for any missing information.
- Set a timestamp for the network (see #16).
- Netmaker returns the settings as a response to NetClient. You can add or modify certain settings based on your network.
- Netclient receives the response. If successful, it returns any additional information from Netmaker and configures Local System/WireGuard
- Netclient sends another request to Netmaker’s GRPC server, this time to retrieve a list of peers (all other clients in the network).
- Netmaker sends back a list of nodes, including the currently known configuration of all nodes in the network.
- Netclient uses this information to configure WireGuard. At this point, the node is fully configured as part of the network and should be able to reach other nodes through private addresses.
- Netclient starts the system timer to run the check-in to the server. It waits for changes, reports local changes, and retrieves changes from any other node in the network.
- When other netclients on the network check in with the Netmaker server, they will see that the timestamp has been updated, and they will retrieve a new peer list to complete the update cycle.