WireGuard article series (6): Netmaker installation
This article was last updated on: February 7, 2024 pm
Synopsis of the series:
- WireGuard Part 1: What is a VPN?
- WireGuard Part 2: Introduction to WireGuard - Fast, Modern, Secure VPN Tunnels
- WireGuard Part 3: WireGuard Installation
- WireGuard article series (4): WireGuard is quick to get started
- WireGuard Part 5: Introduction to Netmaker - A Platform for Creating and Managing WireGuard Networks
Next, start installing Netmaker.
🔐 safe:
I personally attach great importance to security, and after buying a NAS, you will see a huge number of attack logs on the NAS, so don’t take chances.
The most basic way to achieve security is: SSL + authentication + firewall.
So I will enable the above 3 blocks by default, of course, this will inevitably bring some installation and configuration complications.
This Netmaker installation enables all relevant security features. In order to enable security features, you need to have at least your owndomain name。
〇. Prerequisites
- Cloud servers from the public cloud
- Have a static IP address over the public network
- Minimum 1C1G
- 2GB+ storage
- Install the Ubuntu 20.04 operating system
- domain name
- Public network domain name (e.g. my domain name is
e-whisper.com) and filing (the filing process is skipped) - Allow and access to modify DNS records through a DNS service (such as my DNS vendor is DNSPod).
- Public network domain name (e.g. my domain name is
First, prepare DNS
Create a wildcard record pointing to the public IP address of your ECS, for example,*.netmaker.e-whisper.com。
For example, my DNS record on the DNSPod console is configured as follows:

The following procedure creates 3 subdomains with this wildcard:
dashboard.netmaker.e-whisper.comapi.netmaker.e-whisper.comgrpc.netmaker.e-whisper.com
Second, install dependencies
Include:
- docker
- docker-compose
- wireguard
1 | |
Third, open the firewall
Ensure that firewall settings are set for Netmaker on the cloud server and cloud security group.
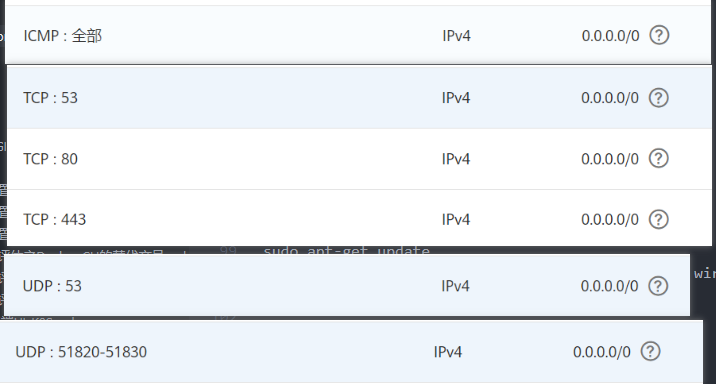
Ensure that the following ports are open in both the VM and the cloud security group:
- 443(tcp): Used for Dashboard, REST API, and gRPC
- 355 (UDP and TCP): Used for CoreDNS
- 51820-51830: For WireGuard-Netmaker, one port is required per network, starting with 51821 (51820 by default for Wireguard), so open a range based on the number of networks you plan to have. For example, 51820-51830.
- ICMP: ICMP is allowed
To enable the firewall on the ECS, perform the following command:
1 | |
Similarly, depending on your cloud provider, you may also need to set up inbound security rules for your servers. This will depend on your cloud provider.
Taking Tianyi Cloud and HUAWEI CLOUD as an example, the cloud security group is configured as follows:
Install Netmaker
⚠️ warn:
COREDNS_IP: Depending on your cloud provider, the public IP might not be directly bound to the VM you’re running. In this case, CoreDNS cannot bind to this IP, and you should use the IP of the default interface on your computer instead of COREDNS_IP. In many cases, this command will provide you with the correct CoreDNS IP: (i.e. the private IP of the ECS)
ip route get 1 | sed -n 's/^.*src \([0-9.]*\) .*$/\1/p'
Now, insert the values for Domain, Public IP, and CoreDNS IP.
1 | |
Over here:
<your base domain>: is something like this:netmaker.e-whisper.com<your server ip>: is the public IP address<default interface ip>: is the private network IP, such as:192.168.1.226
The docker-compose content is as follows (some adjustments have been made based on the original content, see the notes for the adjustments):
1 | |
Generate a unique master key and insert it:
1 | |
⚠️ significant:
Save this key for future use with the API.
4.1 Preparing Caddy
⚠️ note:
My DNS domain name is hosted on DNSPod and cannot automatically request certificates by default, so instead of using caddy in container mode, I use caddy installed by apt with the dnspod plugin installed.
Another possible way is to compile the dnspod plugin into a container and use it yourself.
When you install this package, Caddy is automatically started and runs as a systemd service called Caddy.
1 | |
4.1.1 Caddy uses the DNSPod module
Caddy 2 uses one New and improved DNS provider interface to address the ACME DNS challenge.
All you need to do is plug the service provider you need, like DNSPod, into your build and add DNS challenge to your configuration!
Get the DNSPod DNS plugin
- visit Caddy download
- Find your DNS provider in the list of modules
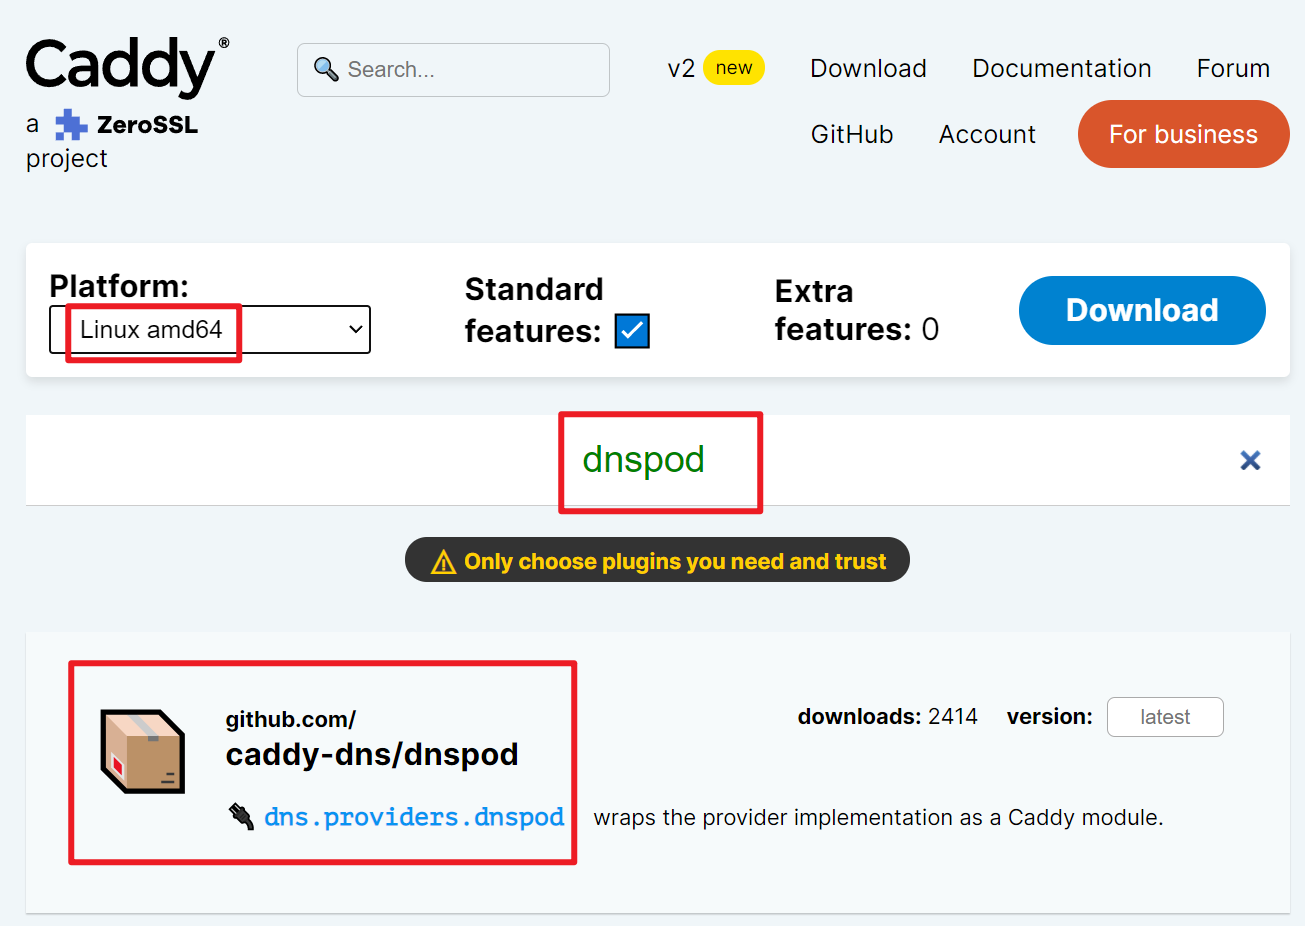
- Downloads, such as my Linux amd64 version of the dnspod plugin download address is:https://caddyserver.com/api/download?os=linux&arch=amd64&p=github.com%2Fcaddy-dns%2Fdnspod&idempotency=14234280192478
4.1.2 Replace the default installed caddy with the downloaded caddy with the dnspod plugin
This process is designed to simplify running custom Caddy binaries while preserving the supporting files in the Caddy package.
This process allows users to take advantage of the default configuration, systemd service files, and bash-completion in the official package.
Precondition:
- Installed
caddy - The DNS (this time DNSPOD) plugin has been downloaded
caddy
Steps:
1 | |
dpkg-divert will /usr/bin/caddy The binary file is moved to /usr/bin/caddy.defaultand place a transfer in case any package wants to install the files in this location.
update-alternatives A binary from the desired caddy will be created to /usr/bin/caddy symbolic link
You can change between the custom binary code and the default binary code by executing the following command
1 | |
And make a selection on the screen.
4.1.3 Create a Caddyfile and start Caddy
Let’s create a Caddyfile and start Caddy, using dnspod to automatically request a free SSL certificate from LetsEncrypt or ZeroSSL as an example:
Prerequisites:
- Buy a domain name (this has to cost money, but some unpopular domains are cheap)
- Know which DNS provider your domain name is and have the corresponding token. Take dnspod as an example,Apply for a token from here
vi /etc/caddy/Caddyfile
{
    # LetsEncrypt account
    email [email protected]
    acme_dns dnspod <dnspod_id>,<dnspod_token>  # 将 <> 中的内容替换为对应的 dnspod id 和 token
}

# Dashboard
https://dashboard.netmaker.e-whisper.com {
    reverse_proxy http://127.0.0.1:8082
}

# API
https://api.netmaker.e-whisper.com {
    reverse_proxy http://127.0.0.1:8081
}

# gRPC
https://grpc.netmaker.e-whisper.com {
    reverse_proxy h2c://127.0.0.1:50051
}
The above configuration is very easy to understand, so I will not explain it.
Start Caddy:
1 | |
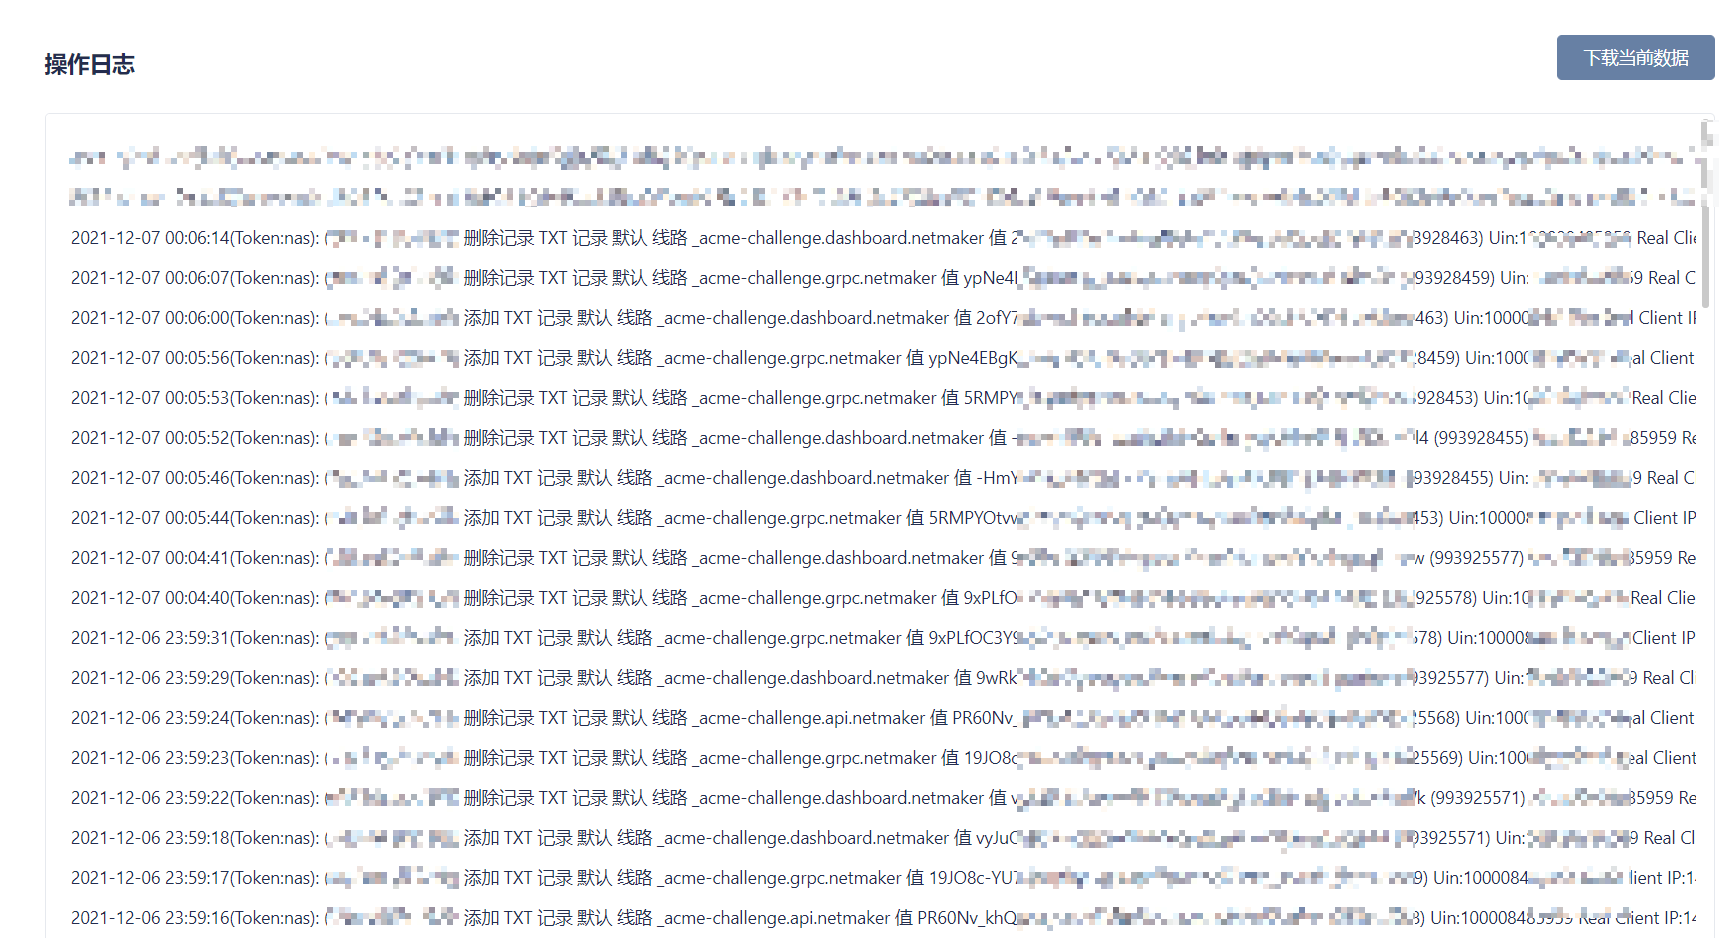
4.1.4 Caddy automatically requests certificates and provides external services
Caddy then automatically requests certificates via LetsEncrypt or ZeroSSL and renews them periodically. Verify that the domain name really belongs to me by adding DNS resolution to DNSPOD (this certificate request method is mentioned in the following log:"challenge_type":"dns-01")。 As shown in the following figure:
You will then get a certificate issued by LetsEncrypt or ZeroSSL, as follows:
Dec 06 16:05:46 09b2brd7robnn5zi-1106883 caddy[119805]: {"level":"info","ts":1638806746.1932435,"logger":"tls.issuance.acme.acme_client","msg":"trying to solve challenge","identifier":"dashboard.netmaker.e-whisper.com","challenge_type":"dns-01","ca":"http>
Dec 06 16:05:53 09b2brd7robnn5zi-1106883 caddy[119805]: {"level":"info","ts":1638806752.9999793,"logger":"tls.issuance.acme.acme_client","msg":"validations succeeded; finalizing order","order":"https://acme-staging-v02.api.letsencrypt.org/acme/order/360>
Dec 06 16:05:53 09b2brd7robnn5zi-1106883 caddy[119805]: {"level":"info","ts":1638806753.1332862,"logger":"tls.issuance.acme.acme_client","msg":"validations succeeded; finalizing order","order":"https://acme-staging-v02.api.letsencrypt.org/acme/order/360>
Dec 06 16:05:53 09b2brd7robnn5zi-1106883 caddy[119805]: {"level":"info","ts":1638806753.6776898,"logger":"tls.issuance.acme.acme_client","msg":"successfully downloaded available certificate chains","count":1,"first_url":"https://acme-staging-v02.api.let>
Dec 06 16:05:53 09b2brd7robnn5zi-1106883 caddy[119805]: {"level":"info","ts":1638806753.6779523,"logger":"tls.issuance.acme","msg":"waiting on internal rate limiter","identifiers":["grpc.netmaker.e-whisper.com"],"ca":"https://acme-v02.api.letsencrypt.org/>
Dec 06 16:05:53 09b2brd7robnn5zi-1106883 caddy[119805]: {"level":"info","ts":1638806753.677963,"logger":"tls.issuance.acme","msg":"done waiting on internal rate limiter","identifiers":["grpc.netmaker.e-whisper.com"],"ca":"https://acme-v02.api.letsencrypt.>
Dec 06 16:05:56 09b2brd7robnn5zi-1106883 caddy[119805]: {"level":"info","ts":1638806756.0425541,"logger":"tls.issuance.acme.acme_client","msg":"trying to solve challenge","identifier":"grpc.netmaker.e-whisper.com","challenge_type":"dns-01","ca":"https://a>
Dec 06 16:05:59 09b2brd7robnn5zi-1106883 caddy[119805]: {"level":"info","ts":1638806759.301592,"logger":"tls.issuance.acme.acme_client","msg":"successfully downloaded available certificate chains","count":1,"first_url":"https://acme-staging-v02.api.lets>
Dec 06 16:05:59 09b2brd7robnn5zi-1106883 caddy[119805]: {"level":"info","ts":1638806759.3018231,"logger":"tls.issuance.acme","msg":"waiting on internal rate limiter","identifiers":["dashboard.netmaker.e-whisper.com"],"ca":"https://acme-v02.api.letsencrypt>
Dec 06 16:05:59 09b2brd7robnn5zi-1106883 caddy[119805]: {"level":"info","ts":1638806759.3018348,"logger":"tls.issuance.acme","msg":"done waiting on internal rate limiter","identifiers":["dashboard.netmaker.e-whisper.com"],"ca":"https://acme-v02.api.letsen>
Dec 06 16:06:00 09b2brd7robnn5zi-1106883 caddy[119805]: {"level":"info","ts":1638806760.909151,"logger":"tls.issuance.acme.acme_client","msg":"trying to solve challenge","identifier":"dashboard.netmaker.e-whisper.com","challenge_type":"dns-01","ca":"https>
Dec 06 16:06:08 09b2brd7robnn5zi-1106883 caddy[119805]: {"level":"info","ts":1638806768.1700737,"logger":"tls.issuance.acme.acme_client","msg":"validations succeeded; finalizing order","order":"https://acme-v02.api.letsencrypt.org/acme/order/310057420/4>
Dec 06 16:06:09 09b2brd7robnn5zi-1106883 caddy[119805]: {"level":"info","ts":1638806769.6764278,"logger":"tls.issuance.acme.acme_client","msg":"successfully downloaded available certificate chains","count":2,"first_url":"https://acme-v02.api.letsencrypt>
Dec 06 16:06:09 09b2brd7robnn5zi-1106883 caddy[119805]: {"level":"info","ts":1638806769.67741,"logger":"tls.obtain","msg":"certificate obtained successfully","identifier":"grpc.netmaker.e-whisper.com"}
Dec 06 16:06:09 09b2brd7robnn5zi-1106883 caddy[119805]: {"level":"info","ts":1638806769.6776047,"logger":"tls.obtain","msg":"releasing lock","identifier":"grpc.netmaker.e-whisper.com"}
Dec 06 16:06:14 09b2brd7robnn5zi-1106883 caddy[119805]: {"level":"info","ts":1638806774.210461,"logger":"tls.issuance.acme.acme_client","msg":"validations succeeded; finalizing order","order":"https://acme-v02.api.letsencrypt.org/acme/order/310057420/45>
Dec 06 16:06:15 09b2brd7robnn5zi-1106883 caddy[119805]: {"level":"info","ts":1638806775.165971,"logger":"tls.issuance.acme.acme_client","msg":"successfully downloaded available certificate chains","count":2,"first_url":"https://acme-v02.api.letsencrypt.>
Dec 06 16:06:15 09b2brd7robnn5zi-1106883 caddy[119805]: {"level":"info","ts":1638806775.1666183,"logger":"tls.obtain","msg":"certificate obtained successfully","identifier":"dashboard.netmaker.e-whisper.com"}
ℹ️ prompt:
The generated certificate is located at:/var/lib/caddy/.local/share/caddy/ directory
4.2 Start Netmaker
Finally to Netmaker, start it with the following command:
1 | |
Then visit:dashboard.<your base domain> (In this example:dashboard.netmaker.e-whisper.comGet started with Netmaker.
5. Netmaker basic interface and use
Once accessed, first create an administrator. After creation, it will enter the home page, as follows:
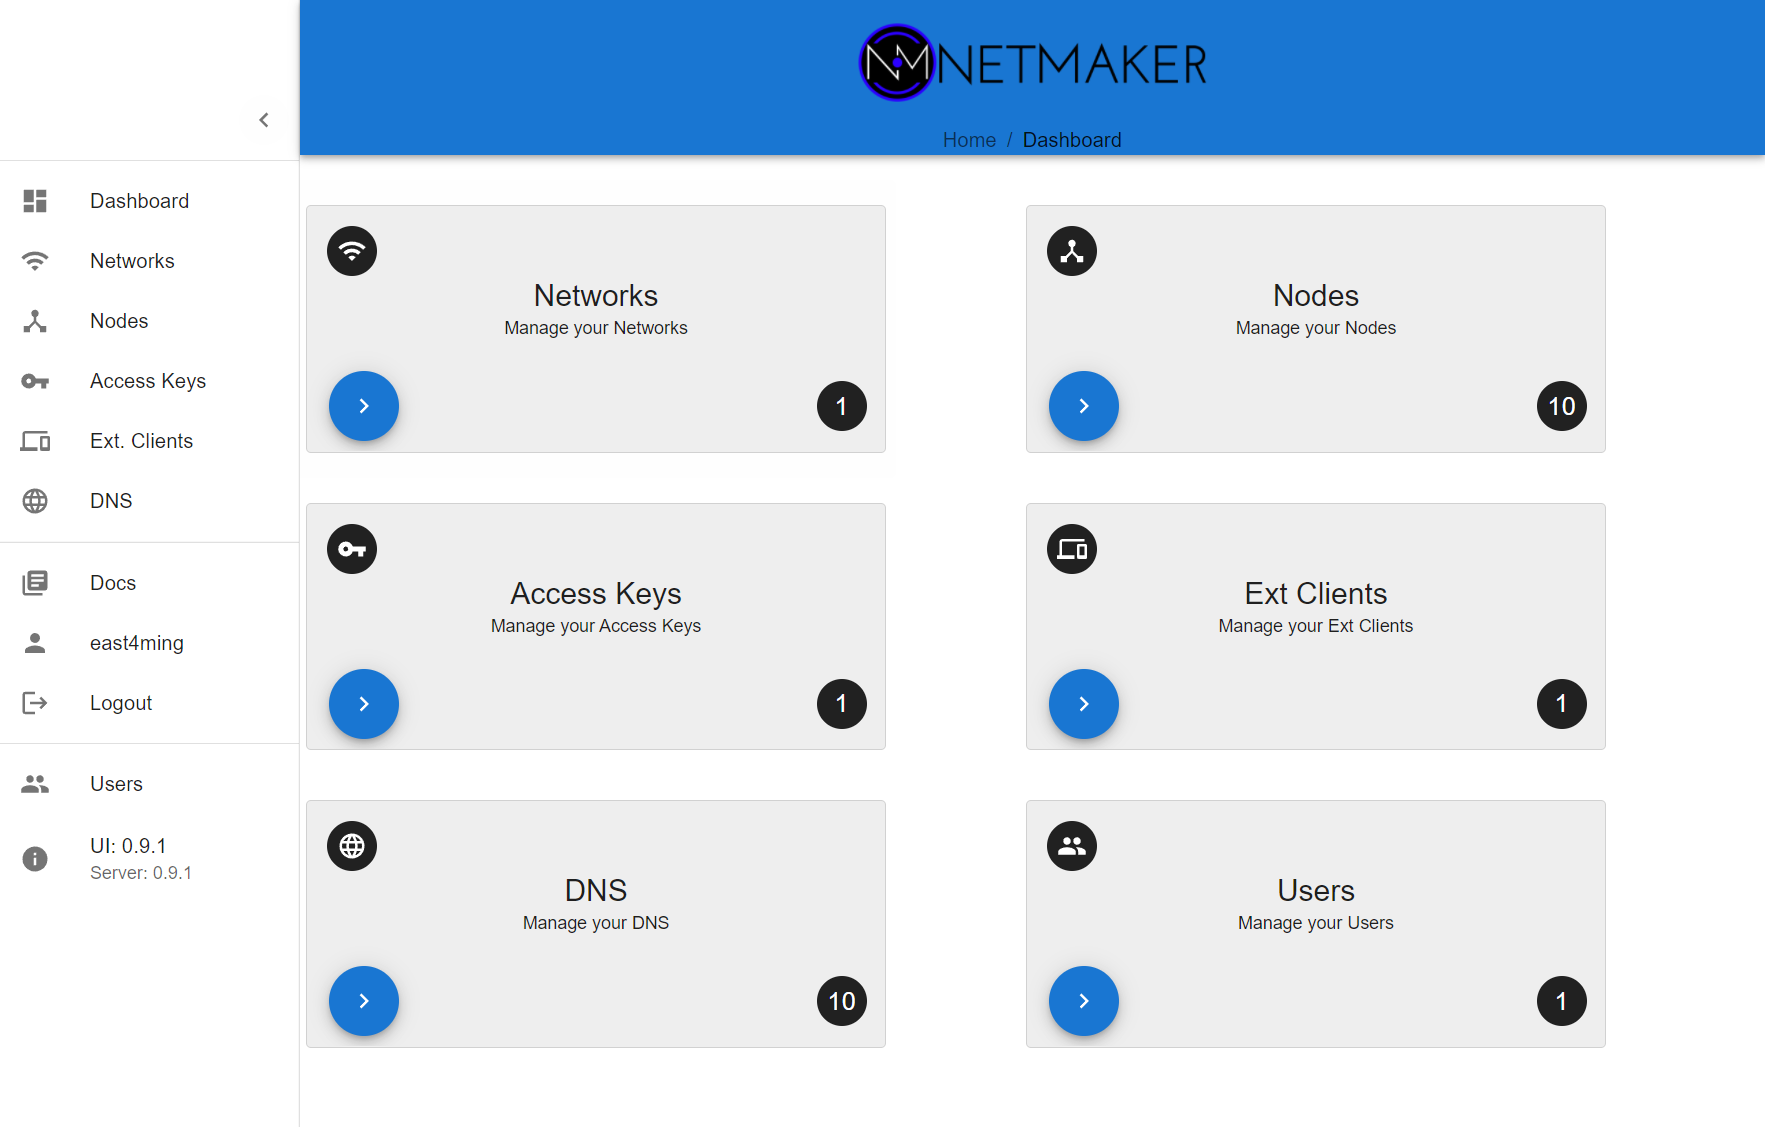
On the left:
- Dashboard
- Internet
- node
- Access keys
- External clients
- DNS
- documentation
- Administrator account
- log off
- user
- Version information
The dashboard has 6 main main contents:
- Internet
- node
- Access keys
- External clients
- DNS
- user
To create a Full Mesh network, the basic process is:
- On the Network page, enter the basic network information to create a network.
- When creating a network, the host where Netmaker is located will be added to Node by default, and the node status can be seen on the Nodes and DNS pages;
- Create an Access Key, specifying how many Netclient clients the key will use; At the same time, the page will pop up the command to join the network through netclient
- On other nodes, execute the corresponding instructions to complete the formation of the Full Mesh network; After that, WireGuard’s peers and other configurations will be managed by Netmaker;
- For clients such as Android that do not yet support Netclient, you can first specify one of the above nodes as Ingress Gateway (which can be understood as WireGuard’s relay server), and then create an External Client to automatically generate configuration and configuration QR codes, and Android phones can scan the code to add configuration and join the network