HTTPS Fundamentals and Configuration-3
This article was last updated on: February 7, 2024 pm
The book continues from above:HTTPS Fundamentals and Configuration - 2, next:
- Configure NGINX
- Back-end HTTPS
- Check the configuration
- Configure HSTS
- OCSP Stapling
The big part is coming. How do I use these options and configure NGINX?
1. NGINX’s HTTPS configuration
Here are some basic primitives (or directives) you can use:ssl_certificate、ssl_certificate_key、ssl_protocols andssl_ciphers。
1.1 NGINX configuration parameters (OpenSSL)
Before you start: The way NGINX handles TLS is to use OpenSSL, and I’m sure you’ve heard about this library in the news. It is known for Heartbleed and some other vulnerabilities. It is indeed the most widely used built-in cryptographic library. This is what NGINX uses for encryption.
So, one thing to do on the server is to check which version of OpenSSL is being used. You may not want to use a version like 0.9.8. You want to use it in the 1.0.1p or 1.0.2 range, as they’ve fixed a lot of bugs over the years. You never know when the next OpenSSL vulnerability will appear, but at least for now it’s pretty solid (1.0.1p). It also has all the modern encryption algorithms.
1.2 NGINX configures the certificate chain and private key
So, when you set up your server section in NGINX,ssl_certificate It’s your certificate chain. This is your certificate plus all the chain of trust all the way down to the root certificate. Then you also need to provide your private key.
ssl_certificate_key It’s your private key.
1 | |
1.3 Additional Options
You can also add some extra options related to session recovery. As mentioned earlier, when you first establish a TLS connection, an additional two round trips are required because you have to complete the entire handshake and exchange certificates. If you have previously connected to a client and they have cached the key used for session transmission, you can only resume that session. This is a feature called session recovery.
You only need a timeout to state how long you want to keep sessions and how large the cache for those sessions can be. In this example, the default is a 10 MB session; That should be enough for you to use for a long time. Shared caches are preferred because you can then share them among all NGINX workers.
For example, if one of your workers is the one that originally made the connection, and the second connection is established to another NGINX worker, you can still restore the connection. There is another option called “Session Ticket”. It is only used in the Chrome kernel browser and Firefox, but it is essentially the same. You’ll have to generate a random 48-byte file, but I recommend using only session caching for now.
1.4 Protocol and cipher configuration for NGINX
As a very obvious next step, you must list the protocols and ciphers you wish to support. In this case, the above is Mozilla’s recommended cipher, as well as the TLS protocol from version 1.2 to version 1.3.
1.5 Miscellaneous
I mentioned how you negotiate the password you choose; You can choose the choice of client or the choice of server. It is better to choose the choice of server. Here’s a directive: ssl_prefer_server_ciphers- Always turn it on.
1.6 Multiple domains of the same certificate
If you have multiple sites, and they all use the same certificate, you can actually break down the HTTP definition. You can use SSL certificates at the top level and different servers at the bottom layer. One thing you need to keep in mind here is if you have example.com and example.org , you must have a certificate that is valid for both names for this to work.
1 | |
The above is basically setting up HTTPS for NGINX.
Second, back-end HTTPS
A more advanced topic is: how can I use NGINX as a proxy for other HTTPS services?

We call this back-end encryption. So, your visitors’ access to your NGINX server is fully encrypted. What’s going on behind NGINX? In this case, NGINX must act as a browser to access your backend service.
2.1 NGINX backend configuration
This can be configured in a similar way in NGINX. There are also similarities ssl_protocols and ssl_ciphers instructions; In this case, you put it under a proxy. NGINX will be used as a client proxy_ssl_protocols and proxy_ssl_cipher Directives.
1 | |
I recommend using the exact same cipher suite and protocol set. The main difference here is that the client authenticates the server. So, in the case of browsers, you have a set of certificate authorities that you trust, and NGINX as a client, you also need a set of certificate authorities that you trust.
2.2 Options for trusted CAs
You can achieve this with two different philosophies, one is to create your own internal certificate authority and manage it internally. It’s a bit tricky, but it’s cheaper and easier to manage because you can issue certificates for any service and issue them to a certificate authority that you own and have full control over. In this case,proxy_ssl_trusted_certificate will be set as your certificate authority.
Alternatively, you can use me inPrevious articleThe same technique described in . You can buy certificates for all your services, and then if your NGINX needs to trust them, it can trust the same set of certificate authorities that browsers trust.
For Ubuntu, there is a list on disk that contains all certificates for almost all platforms. However, if you’re building a large set of services that need to communicate with each other, it’s hard to issue certificates for those domains. You must prove ownership to a certificate authority to actually obtain the certificate.
I recommend the internal CA mechanism. The hardest part is – how to keep the certificate authority secure? How do I secure the certificate authority’s private key? You can do this by using offline computers and special administrators, but in either case, there are some challenges.
Third, check the configuration
NGINX has HTTPS set up. How to check if it is configured correctly?
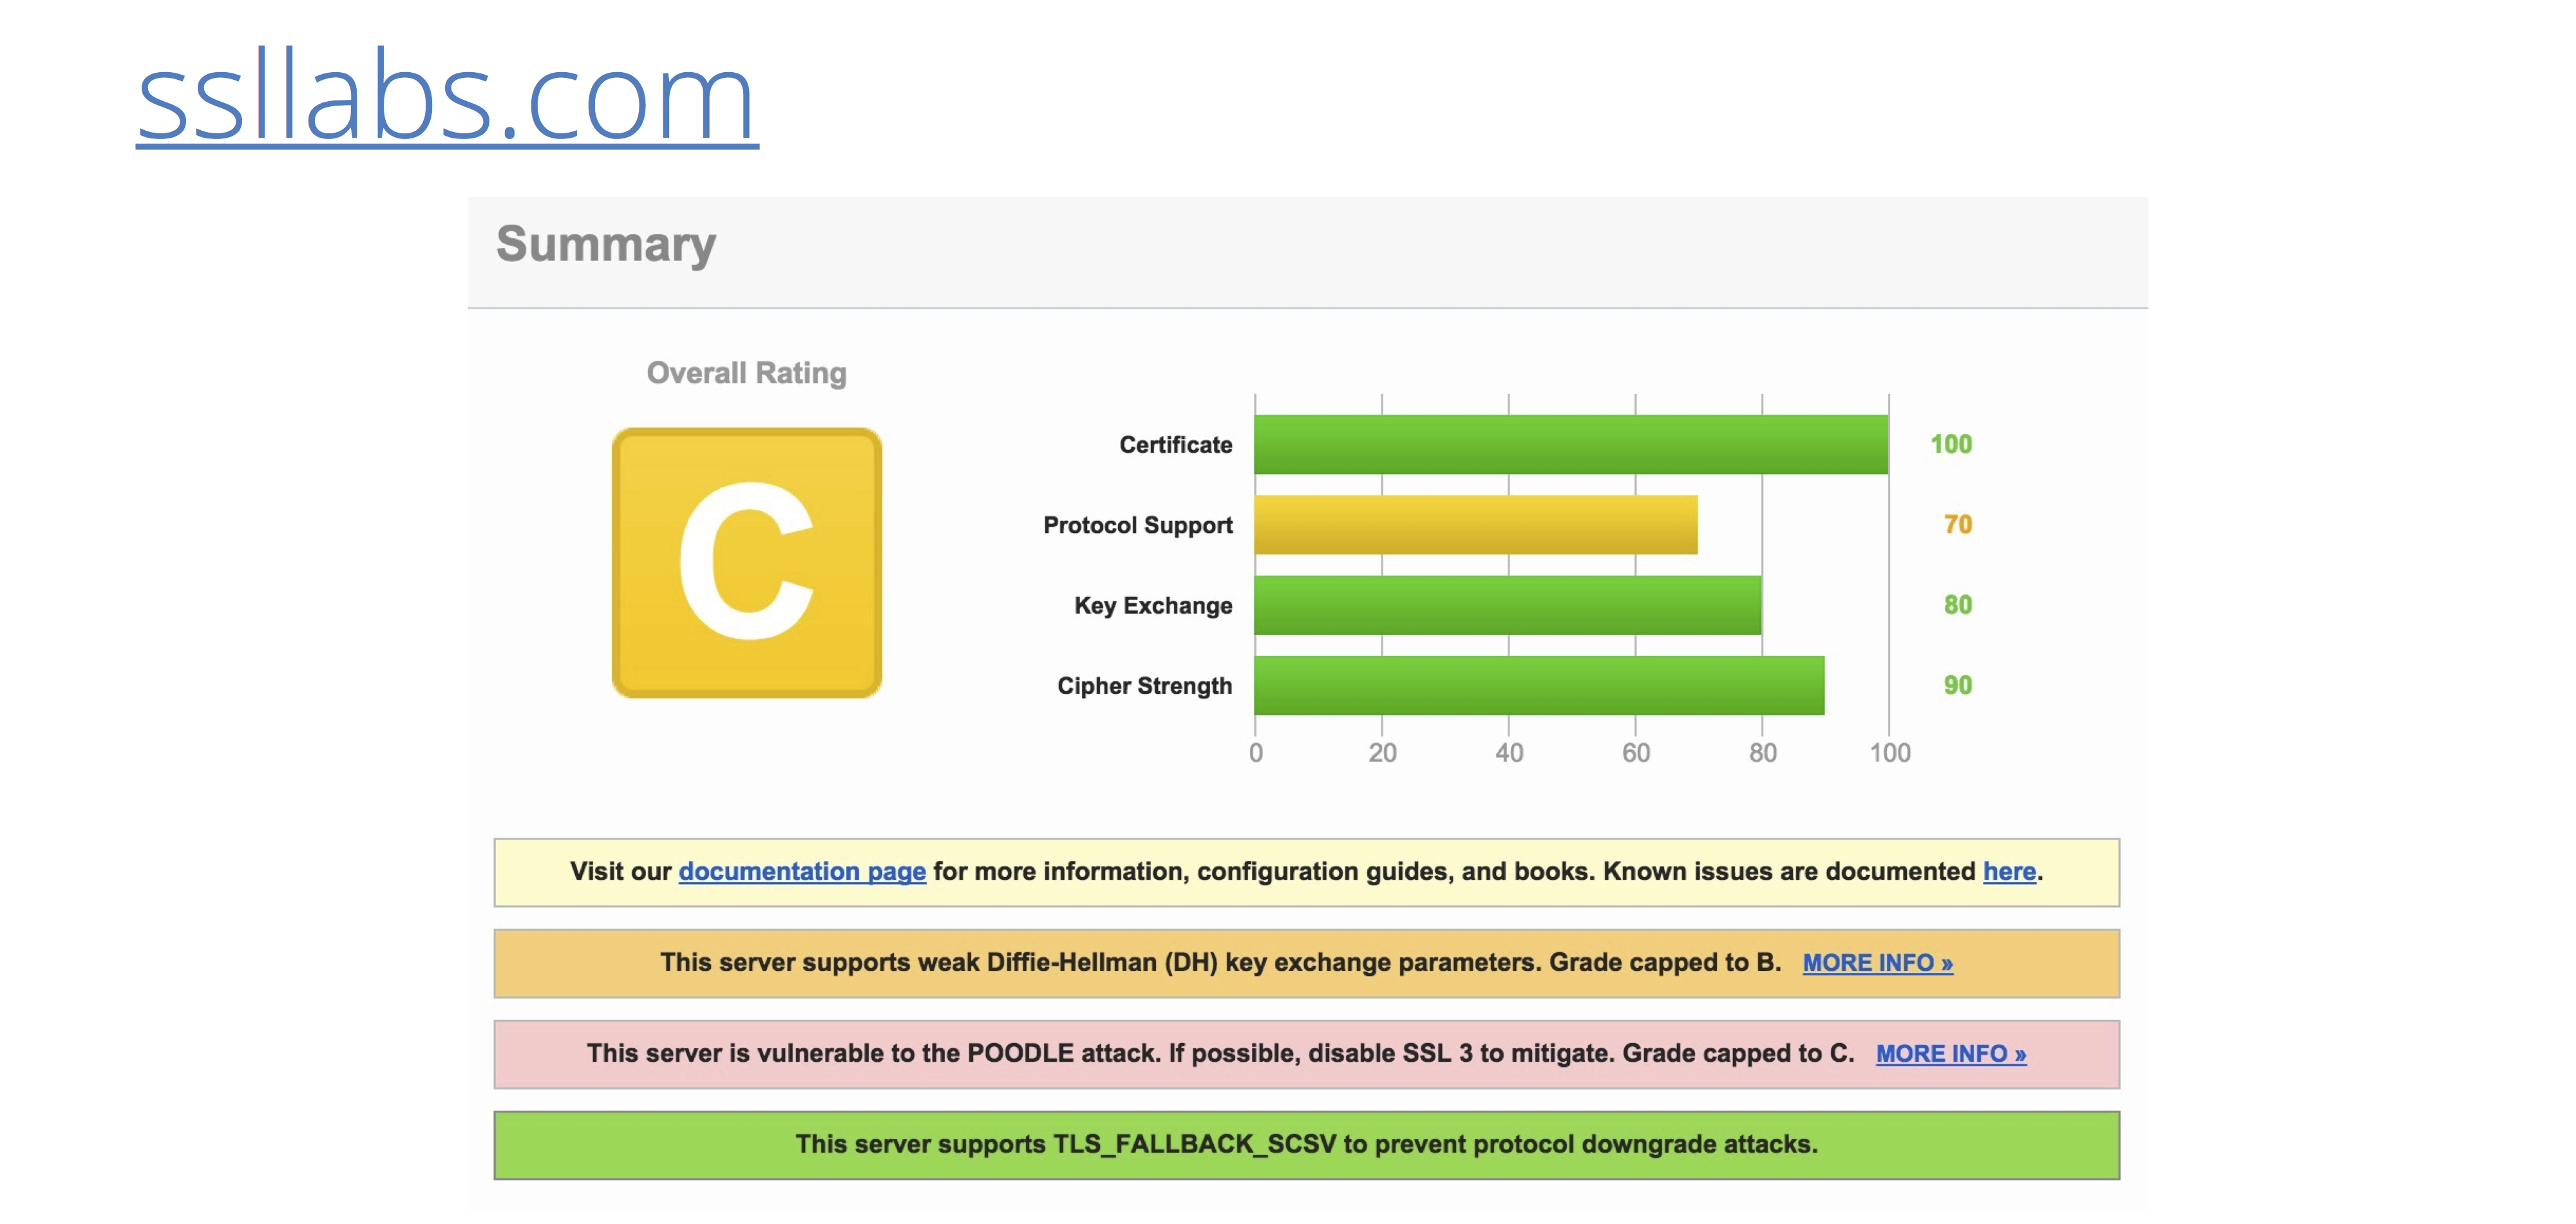
SSL Labs is one of people’s favorite website inspection tools. SSL Labs is a website operated by Qualys; All you have to do is enter your domain name and it will run all types of browsers, all types of SSL connections, and it will tell you which settings are correct and which are wrong.
In this example, we examined a website called badSSL.com, which lists all the different methods that can cause confusion in the HTTPS configuration. You can scan each one with SSL Labs and it will tell you what is wrong with each one. In this example, the given rating is C, as it supports SSL v3.0.
There are a few other things mentioned here that you can modify, but in my description of how to set up NGINX, if you set it up that way, you basically get it A。 This means that certificate protocol support, key exchange, and cipher strength are all top-notch.
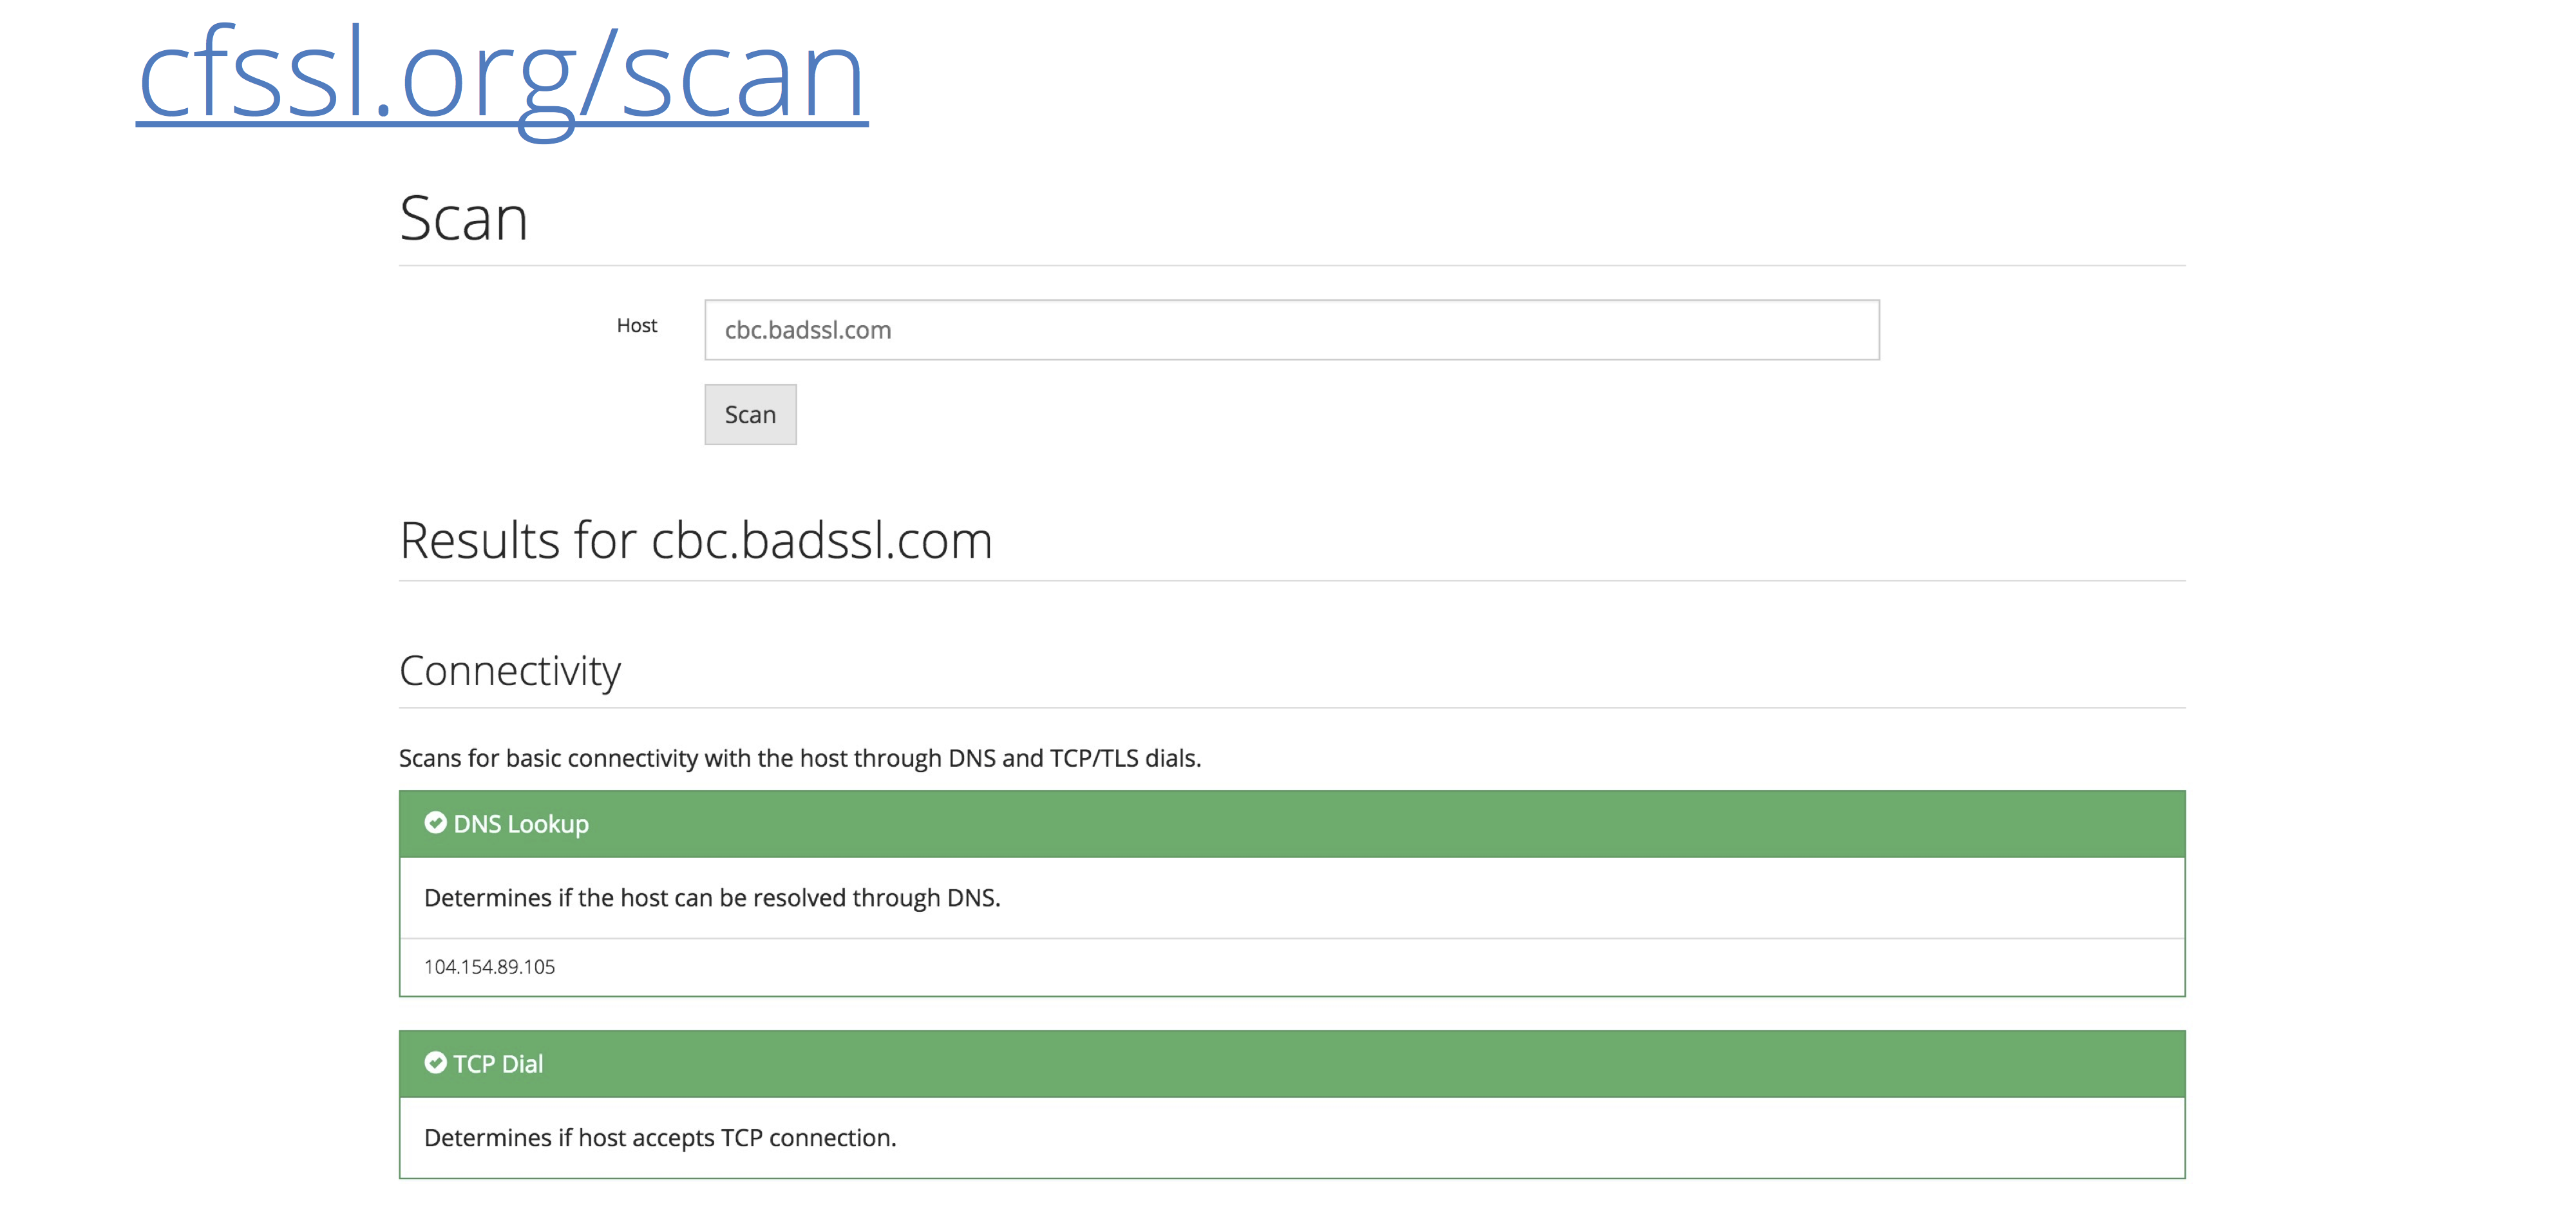
3.1 CFSSL scan
This works very well for internet sites; If you have a firewall or services behind NGINX, CloudFlare built this tool called CFSSL scanning. You can use it in your internal infrastructure; It is open source, in cloudflare/cfssl: CFSSL: Cloudflare’s PKI and TLS toolkit (github.com)Above. It will do essentially the same thing as SSL Labs, just within your infrastructure. It will tell you what is right and what is wrong.
4. Bonus: Configure HSTS
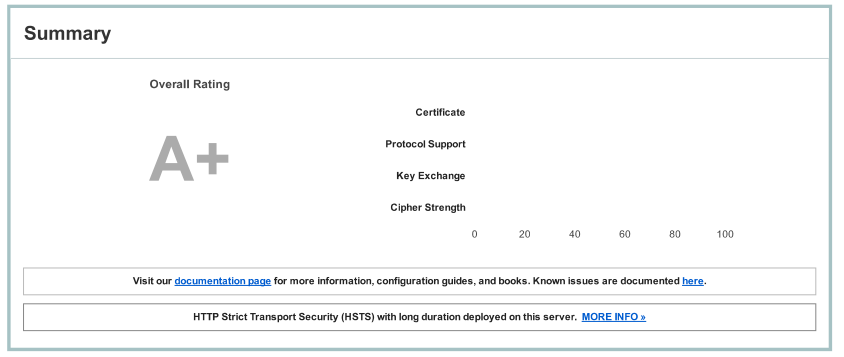
Mentioned earlier to get A method, then A+ This? As it turns out, SSL Labs will give one **A+**When you have a feature called HSTS (Hypertext Strict Transport Security).
4.1 What is HSTS?
Essentially, this is an HTTP header that you can add to your request telling the browser to always access the site over HTTPS. Even if they were originally accessed via HTTP, they are always redirected to HTTPS.
However, this is actually a bit dangerous, because if your SSL configuration breaks or the certificate expires, then visitors will not be able to access the HTTP-only version of the site. You can also do something more advanced. It’s about adding your site to the preload list. Chrome and Firefox both have a list, so if you sign up, they’ll never access your site over HTTP.
4.2 Why do you want to do this?
SSL Labs will give you one A+ If everything else is correct. You need to set it up correctly includeSubdomains HSTS (which means it applies to all subdomains), and it must have at least 6 months of validity, which makes it very dangerous. This is because if you change your configuration, the browser will remember these six months. So you have to keep your HTTPS configuration working.
This is a good thing because it prevents anyone from modifying it in the middle. With HSTS, browsers won’t even have a chance to access your HTTP side, so people won’t interfere with your site in this regard. So HSTS is a very reliable method.
4.3 Risks
As I mentioned, there are several risks:
- Block people from accessing the site over HTTP
- If the HTTPS configuration is abnormal (such as an expired certificate), the site is inaccessible
4.4 NGINX configuration HSTS
1 | |
To set it up, simply add a header file to the server configuration of NGINX, which reads Strict-Transport-Security, and give it a maximum time (max-age)。 In this example, it is set to 6 months (which is the minimum time required to preload the list). You can also add other directives here, such as includeSubdomains and preload, which means that this directive can be accepted and added to the preload list. This is how you get A+.
Another plus: configuring OCSP stapling
This is another additional feature that some people like to use, and it can actually help speed up the connection.
5.1 What is OCSP Stapling?
As I mentioned earlier, there are a lot of back and forth steps involved in establishing a TLS connection. What I didn’t mention is that these certificates can not only expire, but also be revoked.
Therefore, if you lose your private key, there is a vulnerability, or someone else illegally owns your private key, then you must go to your certificate authority and revoke this key. There are several mechanisms to tell the browser that a certificate has been revoked; They’re all a bit sketchy, but the most popular is OCSP (Online Certificate Status Protocol).
What happens: When the browser receives the certificate, it must also check if it has been revoked. So it contacted the certificate authority and asked, “Is this certificate still valid?” They will answer “yes” or “no”. This in itself is another set of connections, you need to look up the DNS of the CA, you need to connect to the CA, which is an additional slowdown for your website.
HTTPS doesn’t just need three round trips, you also need OCSP. Therefore, OCSP stapling allows the server to obtain proof that the certificate has not expired. In the background, get this OCSP response that says “Yes, the certificate is good” and put it in the handshake. This way the client doesn’t need to actually touch the CA and get it.
5.2 How much faster will it be?
An example of a complete HTTPS website visit process is as follows:
- DNS(1334ms)
- TCP Handshake (240ms)
- SSL Handshake (376ms)
- Trace Certificate Chain (1011ms)
- DNS records to CA (300ms)
- TCP to CA (407ms)
- OCSP to CA for the first time (598 ms)
- TCP to CA for the second time (317ms)
- OCSP to CA for the second time (444ms)
- Complete SSL Handshake (1270ms)
OCSP Stapling is configured, above 5-9 Steps can be omitted, which can save about 30% of the connection time to visit an HTTPS website.
5.3 NGINX configuration OCSP Stapling
See above (4.4 NGINX configuration HSTS), it is also easy to set up with NGINX. There is an OCSP Stapling directive. Stapling verification refers to the verification of a certificate after it has been bound. As I mentioned earlier (2.2 Options for trusted CAs), with a proxy, you must trust the CA. You can get a file from the CA and add it to it through the Trusted Certificates section.
summary
This is how to configure NGINX and OCSP staple, HSTS, and SSL proxying.
As I mentioned, in 2008, TLS v1.2 was the latest and best. Recently, they released a new version, TLS v1.3.
HTTPS is an ever-changing landscape, and our configurations and best practices may need to be adapted accordingly.