How stateful software can quickly scale or even automatically scale on k8s
This article was last updated on: February 7, 2024 pm
overview
In a traditional VM/physical environment, what steps do we need to take if we want to scale a stateful application?
- Apply for a VM/physical machine
- Install dependencies
- Download the installation package
- Configure the hostname, hosts, as per the specification
- Configure the network: including domain name, DNS, virtual IP, firewall…
- Configure monitoring
Today there is a problem in the VM environment because of the insufficient resources of RabbitMQ. The manual scaling process took a long time.
But on K8S, scaling stateful applications is very simple, change it in YAMLreplicasThe number of replicas, wait less than 1 min to expand.
Of course, the most basic: under the image, start the pod (equivalent to the first 3 steps above), there is no need to mention more. So, what other factors allow stateful applications to scale quickly or even automatically on k8s?
There are two reasons for this:
- Peer Discovery + Peer Discovery related implementations (via HostName, DNS, K8S API or others)
- Observability + autoscaling
Let’s select a few typical stateful applications today, one by one:
- Eureka
- Nacos
- Redis
- RabbitMQ
- Kafka
- TiDB
Stateful application capacity expansion on K8S
On Kubernetes, it’s easy to scale stateful applications quickly or even auto-scale. This is thanks to the excellent design and good ecology of Kubernetes. Kubernetes is like an operating system for the cloud-native era. It itself has:
- automation tools;
- Internal service discovery + load balancing
- Internal DNS
- Integration with Prometheus
- Unified declarative API
- Standard, open source ecosystem.
So, you need to expand, one YAML does it all. Includes the ones mentioned above: download, installation, storage configuration, node discovery, joining a cluster, monitoring configuration…
Eureka expands

🔖 Remark:
Stateful scaling layer 1:
StatefulSet + Headless Service
The expansion of eureka is the simplest in K8S stateful applications, namely:
headless service + statefulset
Eureka needs to scale, as long as eureka instances can discover each other. headless service This comes in handy in this case, which is to let each other discover.
A complete cluster of Eureka yaml, as follows: detailed below:
1 | |
1 | |
- The configuration is named
eurekaof Service - In the name
eurekaIn the statefulset configuration, there are a total of 3 eureka copies, and the HOSTNAME of each eureka is:${POD_NAME}.${SERVICE_NAME}. As:eureka-0.eureka - Pass each other
--registerWithEureka=true --fetchRegistry=true --eureka.instance.preferIpAddress=false --eureka.client.serviceUrl.defaultZone=http://eureka-0.${APP_NAME}:8888/eureka/,http://eureka-1.${APP_NAME}:8888/eureka/,http://eureka-2.${APP_NAME}:8888/eureka/Mutual registration through HOSTNAME completes the creation of the cluster.
So, if you want to quickly expand to 5:
- Adjust StatefulSet:
replicas: 5 - in environment variables
APP_OPTSAdd 2 new replicas hostname:http://eureka-3.${APP_NAME}:8888/eureka/,http://eureka-4.${APP_NAME}:8888/eureka/
to complete.
Headless Service
Sometimes load balancing is not needed or wanted, as well as separate service IPs. In this case, you can do this by specifying the Cluster IP (spec.clusterIP) is None to create a Headless Service.
You can use headless services to interface with other service discovery mechanisms without having to be bundled with your Kubernetes implementation.
Cluster IPs are not assigned to this headless service, kube-proxy does not handle them, and the platform does not load balance and route them. How DNS is automatically configured depends on whether the service defines a selection operator.
Nacos

🔖 Remark:
Stateful scaling layer 2:
StatefulSet + Headless Service + Init Container + PVC
Compared to Eureka, nacos through oneinit container(This init container is an automated.) peer discovery Script.) , to achieve rapid expansion of one line of command:
1 | |
The script link is: https://github.com/nacos-group/nacos-k8s/tree/master/plugin/peer
The relevant automated actions for capacity expansion are:
- Automatically discover the HOSTNAME of all replicas from the Headless Service;
- AND WRITE HOSTNAME TO:
${CLUSTER_CONF}This file is under . ${CLUSTER_CONF}This file is all the member information of the nacos cluster. ADD THE INSTANCE THAT WRITES THE NEW HOSTNAME TO THE NACOS CLUSTER.
Here, through Headless Service and PV/PVC (storage nacos plug-in or other data), the topological state and storage state of the pod are maintained, so that users can run stateful applications on Kubernetes.
However, Statefullset can only provide limited management, and with StatefulSet we still need to write complex scripts such as nacospeer-finderrelated scripts), by judging the node number to distinguish the relationship and topology of the node, you need to pay attention to the specific deployment work.
RabbitMQ

🔖 Remark:
Stateful scaling layer 3:
StatefulSet + Headless Service + Plugin (Automated Discovery and Monitoring) + PVC
The cluster of RabbitMQ can refer to the official documentation here: Cluster Formation and Peer Discovery
As mentioned here, dynamic discovery mechanisms rely on external services such as DNS, API (AWS or K8S).
For Kubernetes, the dynamic discovery mechanism used is based onRabbitmq-peer-discovery-k8s plugin** Implemented.
With this mechanism, nodes can get a list of their peers from the Kubernetes API endpoint using a configured set of values: URI mode, host, port, and token and certification path.
In addition, the rabbitmq image also integrates the monitoring plugin by default - rabbitmq_prometheus.
Of course, passHelm ChartIt can also be deployed and expanded with one click.
Helm Chart
In a word, Helm is to Kubernetes what yum is to Centos. Fixed the dependency issue. A large number of yaml required to deploy software as complex as rabbitmq can be quickly deployed by parameterizing and abstracting the necessary parameters (and providing default parameters).
Redis
![]()
🔖 Remark:
Stateful expansion layer 4:
Unified orchestration and management with Operator:
Deployment + StatefulSet + Headless Service + Sidecar Container + PVC
Here is open source from UCloud: redis-operator for example. It is based on Sentinel mode The Redis cluster.
Unlike the previous StatefulSet + Headless, a new K8S technology is used: operator.
Operator principle
📖 Illustrate:
To explain Operators, we have to mention two of the most valuable ideas in Kubernetes: “declarative APIs” and “controller patterns.” The core principle of “declarative API” is that after the user submits a description of an API object to Kubernetes, Kubernetes will be responsible for ensuring that the state of the resources in the entire cluster is consistent with the requirements described by your API object. Kubernetes starts an infinite loop called “controller mode” to watch these API objects change, constantly check, then tune, and finally ensure that the state of the entire cluster matches the description of this API object.
For example, Kubernetes comes with the controller: Deployment, if we want to deploy a double copy of the Nginx service in Kubernetes, then we define a deployment object with repicas 2, and after the deployment controller WATCH is added to our object, through the control loop, it will eventually help us start two pods in Kubernetes.
Operator is the same reason, taking our Redis Operator as an example, in order to implement Operator, we first need to register the description of the custom object with Kubernetes, the description of this object is called CustomResourceDefinition (CRD), which is used to describe the application controlled by our Operator: the redis cluster, this step is to make Kubernetes Be able to recognize our application. Then you need to implement a custom controller to go to the Redis cluster instance submitted by the WATCH user, so that when the user tells Kubernetes I want a Redis cluster instance, Redis Operator can execute tuning logic through the control loop to reach the user-defined state.
Simply put, operator can be translated as: O&M (operator) . It is to condense the years of experience of senior OEM operation and maintenance experts into one: operator. Well, all of us O&M workers There is no need to “build xxx clusters from scratch”, but through this scalable, repeatable, standardized, and even full lifecycle operation and maintenance managementoperator。 Complete the installation, expansion, monitoring, backup and even failure recovery of complex software.
Redis Operator
Using Redis Operator we can easily start a sentry mode cluster, the cluster has only one master node, multiple slave nodes, if you specify the size of the Redis cluster is 3, then Redis Operator will help us start a master node, two Salve nodes, and start three Sentinel nodes to manage the Redis cluster:
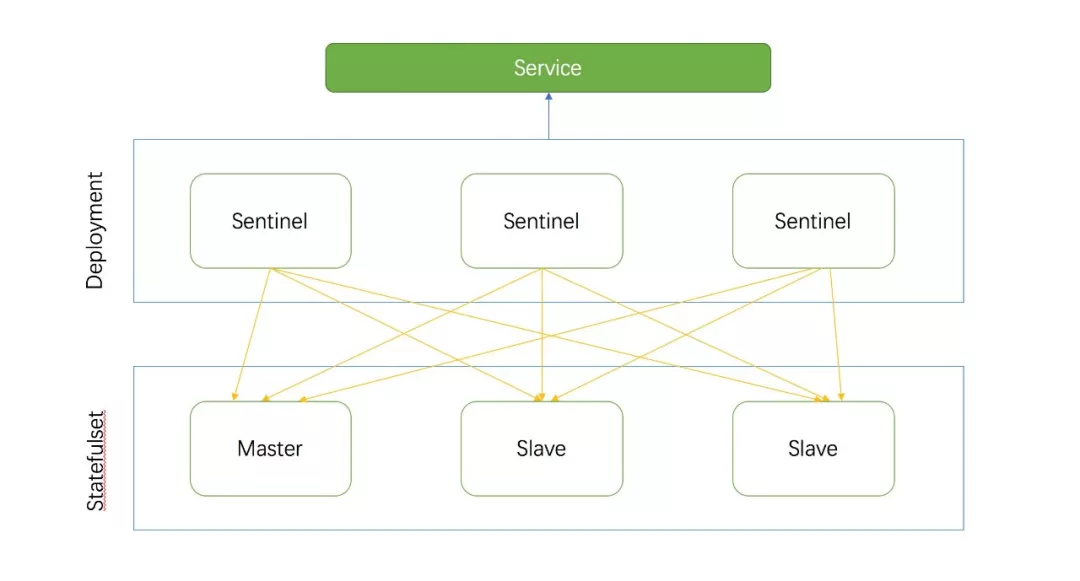
Redis Operator manages Redis nodes through Statefulset and Sentinel nodes through Deployment, which is easier than managing raw pods, saving implementation costs. At the same time, create a service to point to all sentinel nodes, and provide services to the client to query the master and slave nodes through the service. Finally, the Redis Operator control loop will tune the state of the cluster, set the topology of the cluster, let all Sentinel monitor the same master node, monitor the same Salve node, Redis Operator in addition to WATCH instance creation, update, delete events, but also regularly detect the health status of existing clusters, real-time cluster status recorded spec.status.conditions Middle.
At the same time, it also provides the ability to quickly persist, monitor, and automate Redis cluster configuration. With just one YAML:
1 | |
It’s also very simple to scale, going to be on topsize: 3Adjust as needed. After adjustment, automatically apply for resources, expand capacity, add storage, change Redis configuration, join Redis cluster, and automatically add monitoring.
Kafka

🔖 Remark:
Stateful expansion layer 5:
Orchestrate and manage multiple stateful components through the Operator:
StatefulSet + Headless Service + … + Monitoring
Here is Strimzi as an example - Strimzi Overview guide (0.20.0). This is a Kafka Operator.
Apache Kafka components are provided to deploy to Kubernetes through the Strimzi distribution. Kafka components typically run as clusters to improve availability.
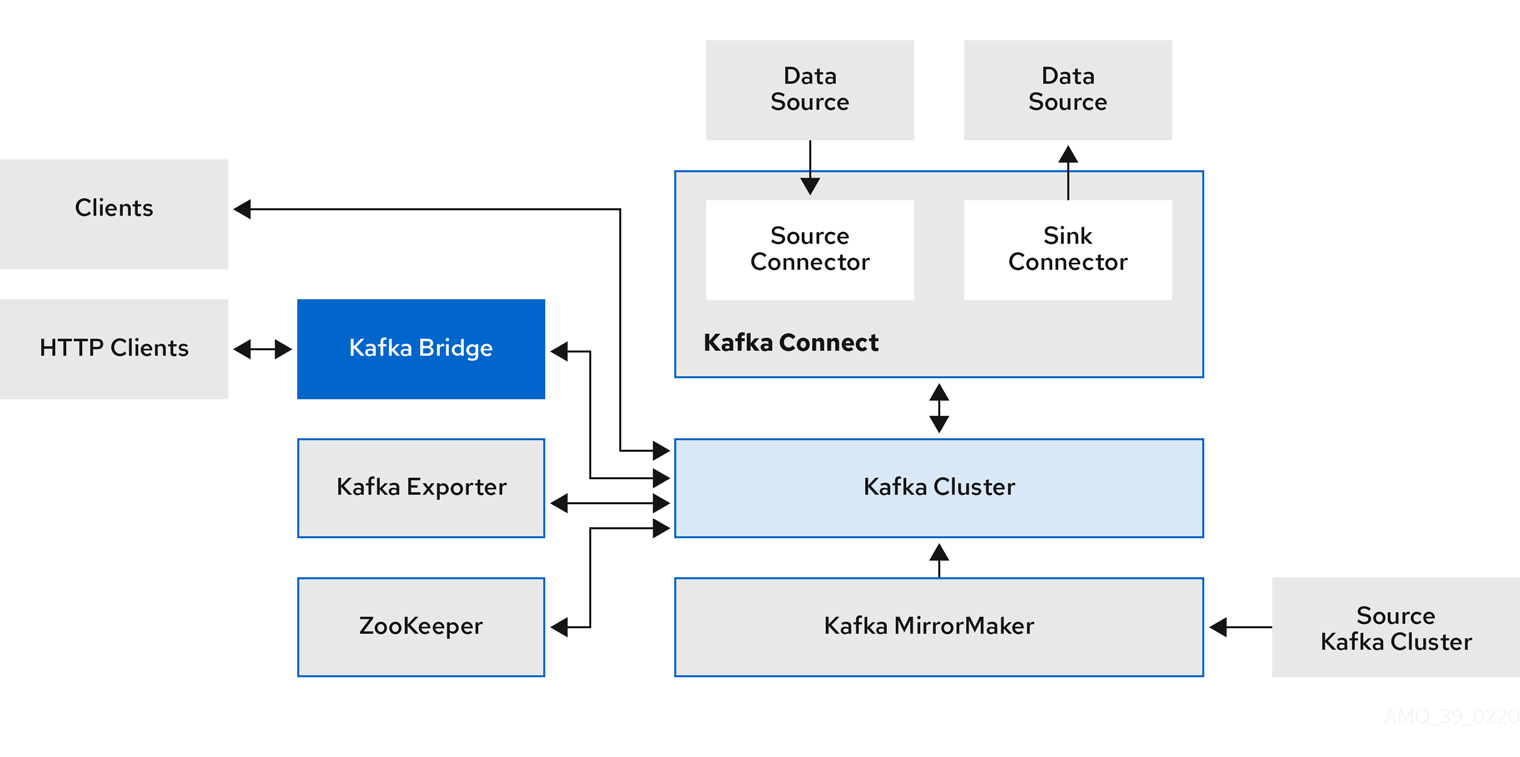
A typical deployment with Kafka components might include:
- Kafka Agent node cluster cluster
- ZooKeeper - A cluster of ZooKeeper instances
- Kafka Connect Clusters are used for external data connections
- Kafka MirrorMaker A cluster mirrors a Kafka cluster in a second cluster
- Kafka Exporter Extract additional Kafka metric data for monitoring
- Kafka Bridge Make an HTTP-based request to the Kafka cluster
Kafka’s component architecture is complex, as follows:
With Operator, a single YAML can complete a complex set of deployments:
- Resource Request (CPU/Memory)
- JSON options for maximum and minimum memory allocation
- Listeners (and authentication)
- authentication
- storage
- Rack awareness
- Monitor metrics
1 | |
Of course, due to the particularity of Kafka, if you want to add the new brokers to the existing cluster, you also need to repartition, more operations involved here are detailed in: Scaling Clusters - Using Strimzi
TiDB
🔖 Remark:
Stateful expansion layer 6:
Orchestrate and manage multiple stateful components through the Operator:
StatefulSet + Headless Service + … + Monitoring + TidbClusterAutoScaler (HPA-like implementation)
Even backup and disaster recovery.
TiDB goes a step further and can be achieved Stateful applications are automatically scaled out.
See here for details: Enable TidbCluster Auto-scaling | PingCAP Docs
Kubernetes provides:Horizontal Pod Autoscaler , which is a native API based on CPU utilization. TiDB 4.0 is based on Kubernetes and implements an elastic scheduling mechanism.
You only need to enable this feature to use:
1 | |
TiDB implements oneTidbClusterAutoScaler CR The AutoScale object is used to control the behavior of autoscaling in a TiDB cluster. If you have usedHorizontal Pod Autoscaler , presumably if you are familiar with the TidbCluster AutoScaler concept. The following is an example of autoscaling in TiKV.
1 | |
It should be noted that: Need toTidbClusterAutoScaler Provides metrics collection and query (monitoring) services because it captures resource usage through the metrics collection component. The monitor property referencesTidbMonitor Object (in fact, it is to automatically configure TiDB’s prometheus monitoring and display, etc.). For more information, see **Use TidbMonitor to monitor TiDB clusters**。
summary
Through 6 stateful software, we have seen the rapid and even automatic scaling of stateful applications on the K8S layer by layer:
- Simplest implementation: StatefulSet + Headless Service – Eureka
- Script/Init Container Automation Implementation: StatefulSet + Headless Service + Init Container + PVC – Nacos
- Scaling and monitoring through plugins: StatefulSet + Headless Service + Plugins (automated discovery and monitoring) + PVC – RabbitMQ
- Unified orchestration and management through Operator: – Redis
- For complex statefuls, it is necessary to orchestrate and manage multiple stateful components through the Operator: – Kafka
- Orchestrate and manage multiple stateful components through the Operator: – TiDB
😂😂😂 Liberate.Development and operation and maintenance workersIt’s time to deploy stateful software on K8S! 💪💪💪