This article was last updated on: February 7, 2024 pm
1.1 Prerequisites
This installation is the latest version of 20220129: Rancher v2.6.3
VM versions are RHEL 7.8, 7.9 or 8.2, 8.3, 8.4 (required by Rancher’s official website)
VM YUM repository: The RHEL and EPEL YUM repositories of the corresponding versions are configured
The VM provides root privileges
NTP configured (to prevent weird problems due to time inconsistencies)
Provide proxy access to Internet Rancher-related domain names;
Port requirements, in order to function properly, Rancher needs to open some ports on Rancher nodes and downstream Kubernetes cluster nodes. Port Requirements lists all the necessary ports for Rancher and downstream clusters for different cluster types. The following table is detailed:
Inbound rules for the Rancher node
Agreement
Port
Source
Purpose
Description
TCP
80
Client, operating machine
Rancher node
Rancher UI/API
TCP
443
Client, operator, all K3S nodes
Rancher node
Rancher agent,Rancher UI/API,kubectl
Outbound rules for Rancher nodes
Agreement
Port
Source
Purpose
Description
TCP
22
Rancher node
All K3S nodes
SSH configuration of the node using the Node Driver
TCP
2376
Rancher node
All K3S nodes
Docker daemon TLS port
TCP
6443
Rancher node
K3S Server
Kubernetes API server
✅ Succeed:
If all of the above preconditions have been met.
That is, you can pass through the “Offline - there is a proxy ” to install.
ℹ️ Information:
The OS configuration proxy process is omitted
1 2 3 ftp_proxy="http://192.168.0.1:8080" "http://192.168.0.1:8080" "http://192.168.0.1:8080"
The doamin that the proxy needs to allow is as follows:
🧠 Comments:
The above allowed domain may not be complete and needs to be supplemented.
2. “Offline - with agent” mode installation
🧠 Comments:
This environment is: offline, with agents.
Passbroker Install the deployment.
Suppose the IP address of the host where Rancher resides is: 192.168.0.100
2.1 Rancher installation configuration
The RHEL 7.8 installation command is as follows:
ℹ️ Information:
The Docker version is: 1.13, and it comes with 3 Docker-related services after installation:
1 2 3 4 5
docker.service The directory is:/usr/lib/systemd/system/docker.service
docker-compose version 1.18.0, build 8dd22a9
RHEL registries.conf Disposition:
disposition insecure-registry:
1 vi /etc/containers/registries.conf
1 2 3 4 5 6 7 8 [registries.search] registries = ['registry.cn-hangzhou.aliyuncs.com' , 'registry.access.redhat.com' , 'registry.redhat.io' , 'docker.io' ][registries.insecure] registries = [][registries.block] registries = []
**Docker configuration Proxy (optional, recommended configuration to ensure that docker uses 100% of the proxy) \
First create the configuration file:
Then add the configuration:
1 2 3 4 [Service] Environment ="HTTP_PROXY=http://192.168.0.1:8080" Environment ="HTTPS_PROXY=http://192.168.0.1:8080" Environment ="NO_PROXY=localhost,127.0.0.1,0.0.0.0,192.168.0.100,10.109.205.245,cattle-system.svc,.svc,.cluster.local,example.com"
Finally restart the container and verify:
🧠 Comments:
Linux NO_PROXY The CIDR mode configuration does not take effect, only the IP address does.
2.1.2 Generate a certificate with a validity period of 100 years
🧠 Comments:
df -h View the file system as follows:
1 2 3 4 5 6 7
/data Directory 100G, so rancher is installed /data/rancher directory.
1 vi create_self-signed-cert.sh
1 2 3 4 5 6 7 8 9 10 11 12 13 14 15 16 17 18 19 20 21 22 23 24 25 26 27 28 29 30 31 32 33 34 35 36 37 38 39 40 41 42 43 44 45 46 47 48 49 50 51 52 53 54 55 56 57 58 59 60 61 62 63 64 65 66 67 68 69 70 71 72 73 74 75 76 77 78 79 80 81 82 83 84 85 86 87 88 89 90 91 92 93 94 95 96 97 98 99 100 101 102 103 104 105 106 107 108 109 110 111 112 113 114 115 116 117 118 119 120 121 122 123 124 125 126 127 128 129 130 131 132 133 134 135 136 137 138 139 140 141 142 143 144 145 146 147 148 149 150 151 152 153 154 155 156 157 #!/bin/bash -e help echo ' ================================================================ ' echo ' --ssl-domain: 生成 ssl 证书需要的主域名,如不指定则默认为 www.rancher.local,如果是 ip 访问服务,则可忽略;' echo ' --ssl-trusted-ip: 一般 ssl 证书只信任域名的访问请求,有时候需要使用 ip 去访问 server,那么需要给 ssl 证书添加扩展 IP,多个 IP 用逗号隔开;' echo ' --ssl-trusted-domain: 如果想多个域名访问,则添加扩展域名(SSL_TRUSTED_DOMAIN), 多个扩展域名用逗号隔开;' echo ' --ssl-size: ssl 加密位数,默认 2048;' echo ' --ssl-cn: 国家代码 (2 个字母的代号), 默认 CN;' echo ' 使用示例:' echo ' ./create_self-signed-cert.sh --ssl-domain=www.test.com --ssl-trusted-domain=www.test2.com \ ' echo ' --ssl-trusted-ip=1.1.1.1,2.2.2.2,3.3.3.3 --ssl-size=2048 --ssl-date=3650' echo ' ================================================================' case "$1 " in help ) help ; exit ;;esac if [[$1 == '' ]];then help ;exit ;fi "$*" for OPTS in $CMDOPTS ;do echo ${OPTS} | awk -F"=" '{print $1}' )echo ${OPTS} | awk -F"=" '{print $2}' )case "$key " in $value ;;$value ;;$value ;;$value ;;$value ;;$value ;;$value ;;esac done ${CA_DATE:-3650} ${CA_KEY:-cakey.pem} ${CA_CERT:-cacerts.pem} ${SSL_CONFIG:-$PWD /openssl.cnf} ${SSL_DOMAIN:-'www.rancher.local'} ${SSL_DATE:-3650} ${SSL_SIZE:-2048} ${CN:-CN} $SSL_DOMAIN .key$SSL_DOMAIN .csr$SSL_DOMAIN .crtecho -e "\033[32m ---------------------------- \033[0m" echo -e "\033[32m | 生成 SSL Cert | \033[0m" echo -e "\033[32m ---------------------------- \033[0m" if [[-e ./${CA_KEY} ]]; then echo -e "\033[32m ====> 1. 发现已存在 CA 私钥,Backup" ${CA_KEY} " 为 " ${CA_KEY} "-bak,然后重新创建 \033[0m" mv ${CA_KEY} "${CA_KEY} " -bak${CA_KEY} ${SSL_SIZE} else echo -e "\033[32m ====> 1. 生成新的 CA 私钥 ${CA_KEY} \033[0m" ${CA_KEY} ${SSL_SIZE} fi if [[-e ./${CA_CERT} ]]; then echo -e "\033[32m ====> 2. 发现已存在 CA 证书,先 Backup" ${CA_CERT} " 为 " ${CA_CERT} "-bak,然后重新创建 \033[0m" mv ${CA_CERT} "${CA_CERT} " -bak${CA_KEY} -days ${CA_DATE} -out ${CA_CERT} -subj "/C=${CN} /CN=${CA_DOMAIN} " else echo -e "\033[32m ====> 2. 生成新的 CA 证书 ${CA_CERT} \033[0m" ${CA_KEY} -days ${CA_DATE} -out ${CA_CERT} -subj "/C=${CN} /CN=${CA_DOMAIN} " fi echo -e "\033[32m ====> 3. 生成 Openssl 配置文件 ${SSL_CONFIG} \033[0m" cat > ${SSL_CONFIG} <<EOM [req] req_extensions = v3_req distinguished_name = req_distinguished_name [req_distinguished_name] [v3_req] basicConstraints = CA:FALSE keyUsage = nonRepudiation, digitalSignature, keyEncipherment extendedKeyUsage = clientAuth, serverAuth EOM if [[-n ${SSL_TRUSTED_IP} || -n ${SSL_TRUSTED_DOMAIN} || -n ${SSL_DOMAIN} ]]; then cat >> ${SSL_CONFIG} <<EOM subjectAltName = @alt_names [alt_names] EOM "," ${SSL_TRUSTED_DOMAIN} )${SSL_DOMAIN} )for i in "${!dns[@]} " ; do echo DNS.$((i+1 )) = ${dns[$i]} >> ${SSL_CONFIG} done if [[-n ${SSL_TRUSTED_IP} ]]; then ${SSL_TRUSTED_IP} )for i in "${!ip[@]} " ; do echo IP.$((i+1 )) = ${ip[$i]} >> ${SSL_CONFIG} done fi fi echo -e "\033[32m ====> 4. 生成服务 SSL KEY ${SSL_KEY} \033[0m" ${SSL_KEY} ${SSL_SIZE} echo -e "\033[32m ====> 5. 生成服务 SSL CSR ${SSL_CSR} \033[0m" ${SSL_KEY} -out ${SSL_CSR} -subj "/C=${CN} /CN=${SSL_DOMAIN} " -config ${SSL_CONFIG} echo -e "\033[32m ====> 6. 生成服务 SSL CERT ${SSL_CERT} \033[0m" in ${SSL_CSR} -CA ${CA_CERT} \${CA_KEY} -CAcreateserial -out ${SSL_CERT} \${SSL_DATE} -extensions v3_req \${SSL_CONFIG} echo -e "\033[32m ====> 7. 证书制作完成 \033[0m" echo echo -e "\033[32m ====> 8. 以 YAML 格式输出结果 \033[0m" echo "----------------------------------------------------------" echo "ca_key: |" cat $CA_KEY | sed 's/^/ /' echo echo "ca_cert: |" cat $CA_CERT | sed 's/^/ /' echo echo "ssl_key: |" cat $SSL_KEY | sed 's/^/ /' echo echo "ssl_csr: |" cat $SSL_CSR | sed 's/^/ /' echo echo "ssl_cert: |" cat $SSL_CERT | sed 's/^/ /' echo echo -e "\033[32m ====> 9. 附加 CA 证书到 Cert 文件 \033[0m" cat ${CA_CERT} >> ${SSL_CERT} echo "ssl_cert: |" cat $SSL_CERT | sed 's/^/ /' echo echo -e "\033[32m ====> 10. 重命名服务证书 \033[0m" echo "cp ${SSL_DOMAIN} .key tls.key" cp ${SSL_DOMAIN} .key tls.keyecho "cp ${SSL_DOMAIN} .crt tls.crt" cp ${SSL_DOMAIN} .crt tls.crt
1 chmod +x create_self-signed-cert.sh
To generate a 100-year certificate:
1 ./create_self-signed-cert.sh --ssl-trusted-ip=192.168.0.100 --ssl-date=3650
Certificate renaming (to comply with the requirements for the Rancher Docker installation):
2.1.3 Install Rancher
Start it in docker-compose mode to facilitate viewing the relevant configuration in the form of a file.
The YAML configuration is referenced here<sup id=“fnref:2” class=“footnote-ref”>[2] [3]
1 2 3 4 5 6 7 8 9 10 11 12 13 14 15 16 17 18 19 20 21 22 23 version: '3.3' services: rancher: restart: unless-stopped ports: - '80:80' - '443:443' environment: - 'HTTP_PROXY=http://192.168.0.1:8080' - 'HTTPS_PROXY=http://192.168.0.1:8080' - 'NO_PROXY=localhost,127.0.0.1,0.0.0.0,192.168.0.100,cattle-system.svc,.svc,.cluster.local,example.com' - CATTLE_TLS_MIN_VERSION=1.0 - SSL_CERT_DIR="/etc/rancher/ssl" - AUDIT_LEVEL=1 - CATTLE_SYSTEM_DEFAULT_REGISTRY=registry.cn-hangzhou.aliyuncs.com volumes: - '/data/rancher:/var/lib/rancher' - '/data/rancher/certs/cert.pem:/etc/rancher/ssl/cert.pem' - '/data/rancher/certs/key.pem:/etc/rancher/ssl/key.pem' - '/data/rancher/certs/cacerts.pem:/etc/rancher/ssl/cacerts.pem' - '/data/rancher/log/auditlog:/var/log/auditlog' privileged: true image: 'registry.cn-hangzhou.aliyuncs.com/rancher/rancher:v2.6.3'
Start rancher:
You can view the startup log with the following command:
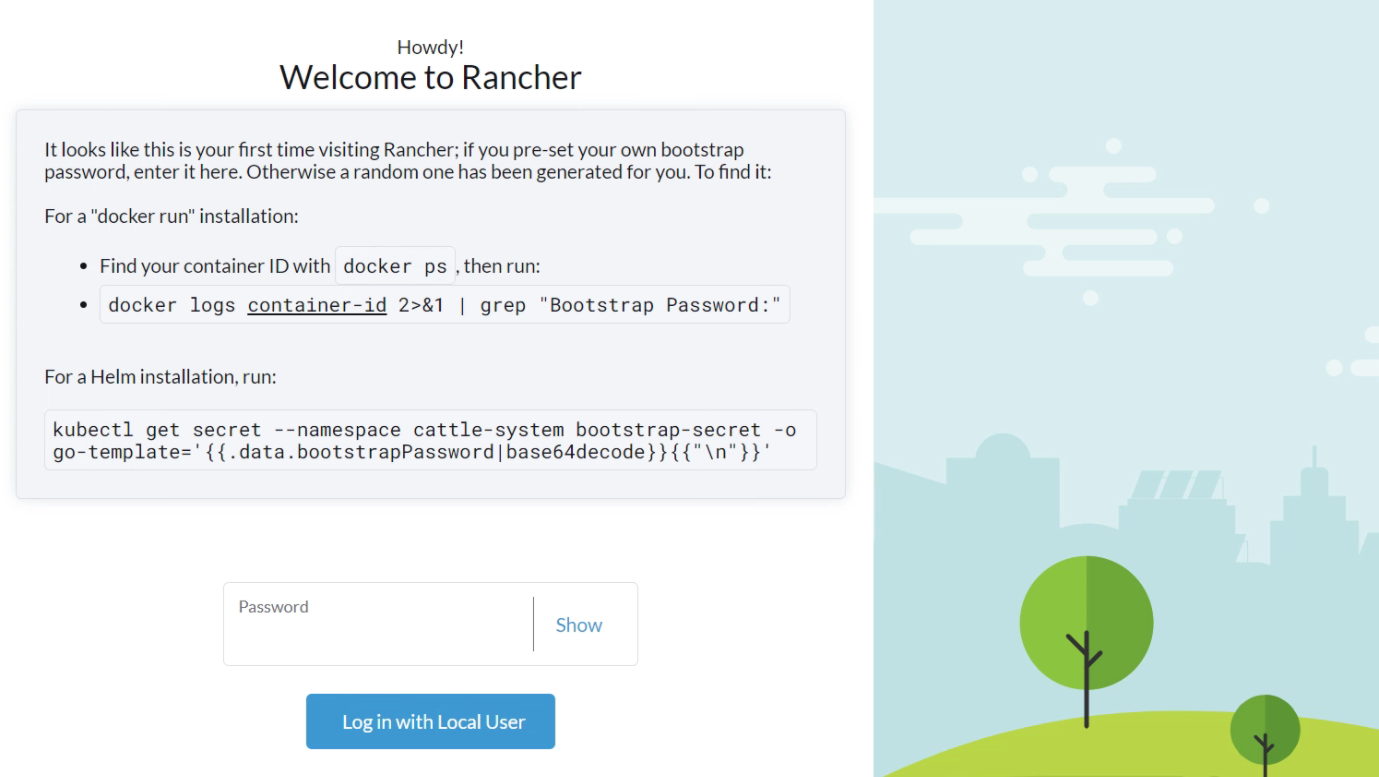
Once launched, access via browser:https://192.168.0.100/ , the first display is as follows:
Enter the following command in Terminal to get the bootstrap password:
1
2
3
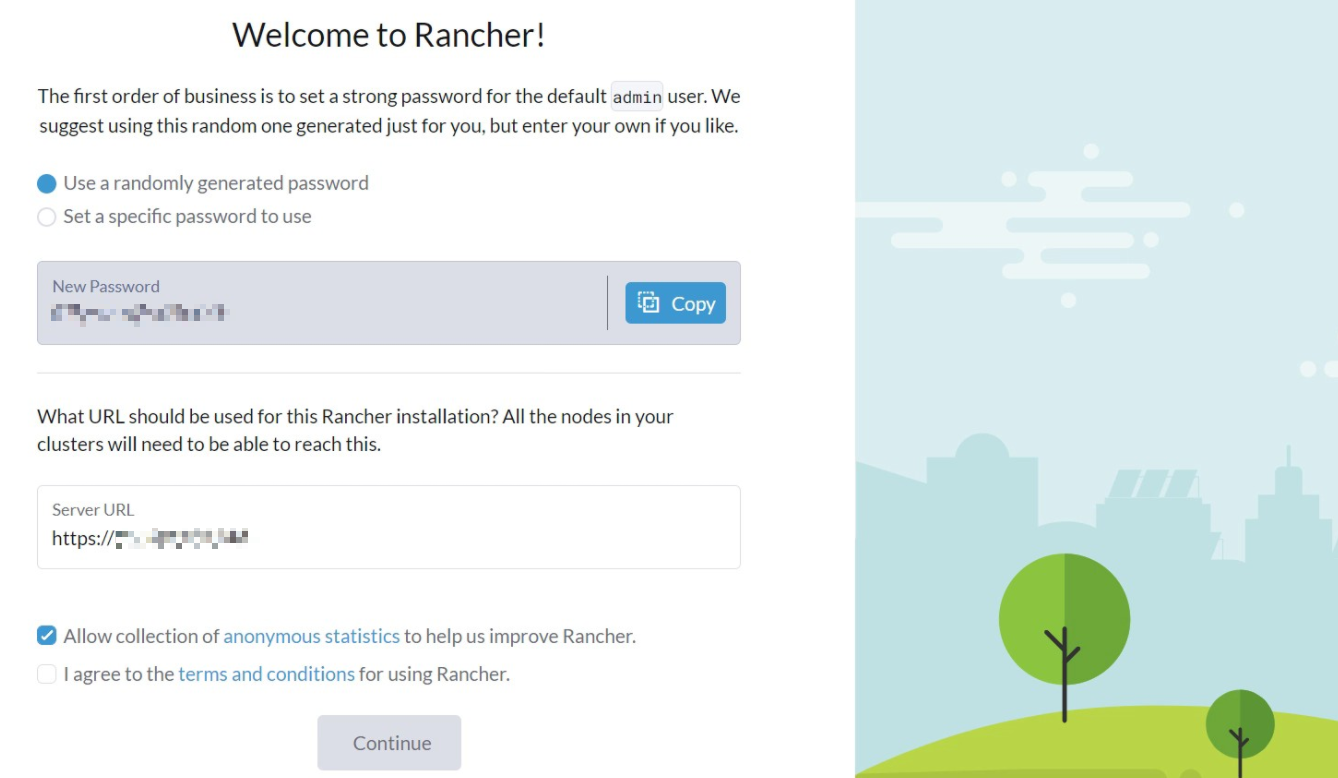
And enter the password into the input box, and then generate an admin password, as follows:
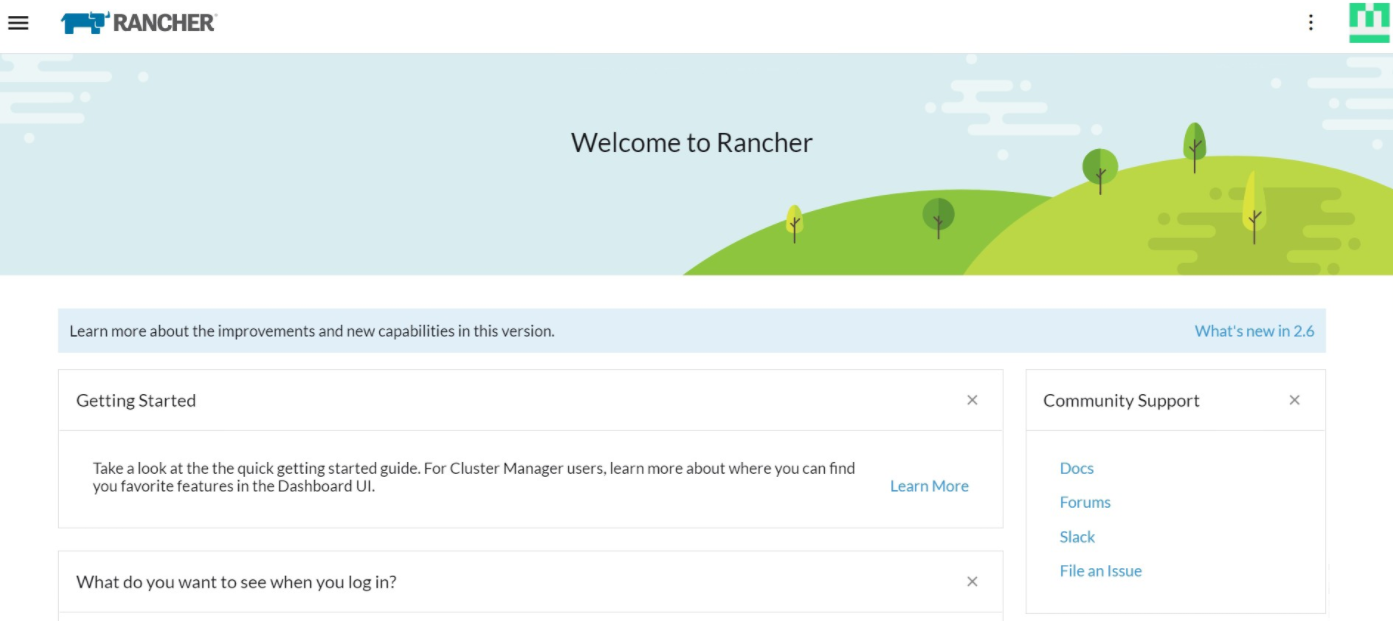
CheckI agree...click Continue Enter the Rancher homepage, as shown below:
The installation of Rancher is complete.
2.1.4 Rancher China optimized configuration
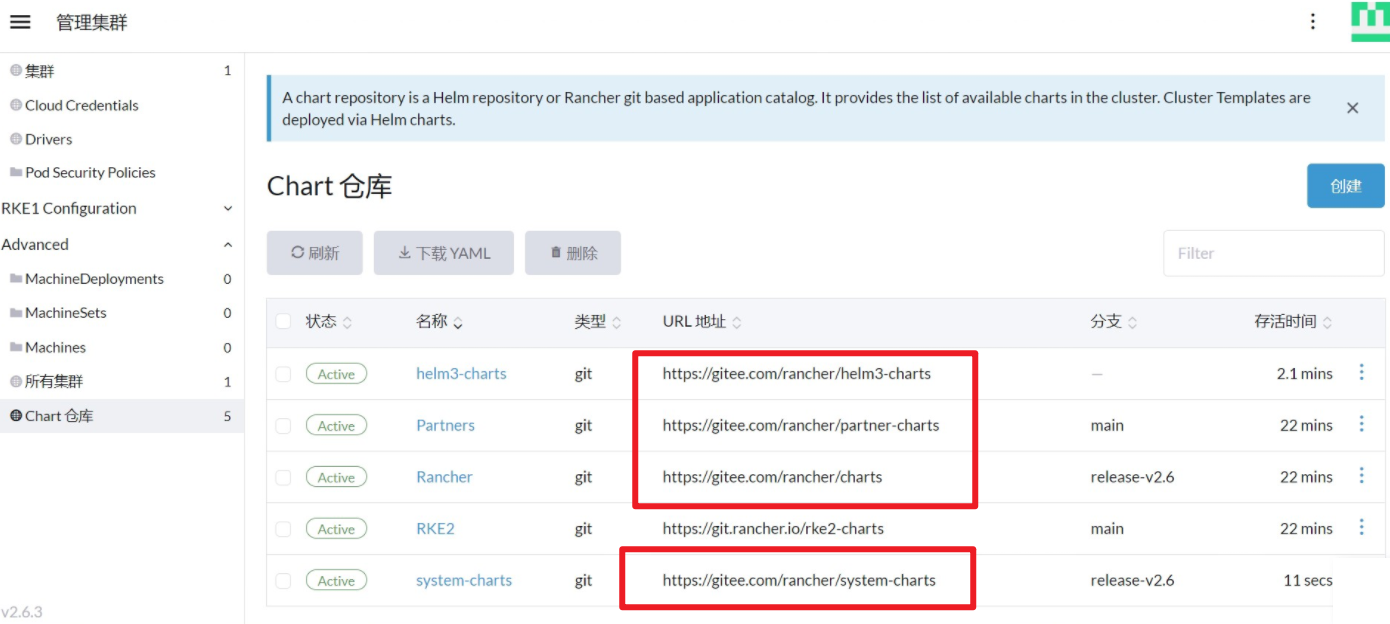
Use code clouds instead of Github
By default, Rancher uses repo on Github as the URL of the Chart repository, and if there is a timeout situation, you can replace the Chart repository URL with the address of the code cloud.
The correspondence for each repo is as follows:
So how do I modify the Chart repository URL?
Click on the hamburger menu in the upper left corner of the home page, select “Manage Cluster”->“Advanced”-> “Chart Repository”
Click the ellipsis -> Edit to the right of the list
Replace the Chart repository URL with the address in the code cloud and click Save
At this point, the status of the corresponding Chart repository changes to Refreshed, and it can be used normally after it becomes active
The amendments are as follows:
summary
At this point, the Rancher single-node installation is complete. 🎉🎉🎉
Address:https://192.168.0.100
Directory:/data/rancher
Certificate Directory:/data/rancher/certs
Audit log directory:/data/rancher/log/auditlog
<section class=“footnotes”>
References