K8s Production Best Practices - Limit NameSpace resource usage
This article was last updated on: February 7, 2024 pm
preface
Imagine this scenario: multiple systems running on the same K8s cluster, with important systems and less important systems. However, one day, an unimportant system suddenly occupies all the resources of the K8s cluster, causing the normal operation of other systems on the cluster to be affected. This article describes how the Kubernetes platform manages capacity, as well as the author’s considerations and recommendations for administrators.
Overview of Kubernetes resource limits
We at Life Insurance understand how the Kubernetes platform applies resource constraints at the container and node level. To discuss reasonable sizing, we’ll focus specifically on CPU and memory, although there are other factors to consider.
You can specify resource requests and limits for each container and pod. Requests are guaranteed resources reserved for pods, while limits are security measures designed to protect the overall architecture of the cluster. In Kubernetes, the relationship between pods’ requests and limits is configured as Quality of Service (QoS). On the node, the kubelet (an agent that can monitor resources) passes this information to the container runtime, which uses kernel cgroups to apply resource constraints.
To schedule new pods, the Kubernetes scheduler determines valid locations on available nodes, taking into account existing pod resource limits. Kubernetes preconfigures some system reservations to set aside resources for the operating system and Kubernetes system components (as shown below). The remaining amount is defined as allocable, and the scheduler treats it as the capacity of the node. The scheduler can schedule unit-to-node capacity based on the total resource requests of all units. Note that the aggregate resource limit for all units can be greater than the node capacity, a practice known as overprovisioning or overselling.
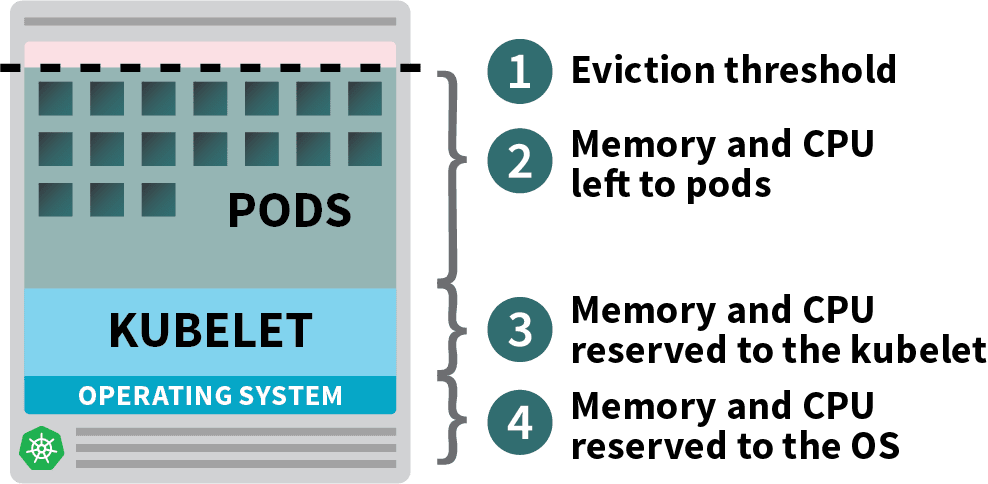
When managing node capacity, we try to avoid two situations. In the first case, the actual memory utilization reaches capacity, and the kubelet triggers node pressure eviction based on the eviction signal. If the node runs out of memory before the kubelet can reclaim it, the node oom-killer responds by selecting pods to remove based on the oom_score_adj value calculated from each pod’s QoS. As a result, the applications that make up these pods are affected.
The underlying mechanism of overuse on the CPU behaves differently than memory because it allocates CPU time to individual containers. High CPU utilization causes CPU throttling, but does not trigger node stress eviction, nor does it automatically cause Kubernetes to terminate pods. However, also note that CPU exhaustion can still cause application pods to degrade, live probes to fail, and restarts.
We also want to avoid another situation. At the node level, requests are guaranteed resources and must be less than capacity because the Kubernetes scheduler is not oversubscribed. If requests are significantly and consistently larger than the resources actually used, the excess capacity is largely unused. While it may be necessary to reserve resources for peak processing times, administrators should balance this with the recurring cost of running excess capacity that may not be needed. Configuring requests based on actual usage is a balancing act that should consider the risk management of the application (balancing availability and cost).
What Kubernetes administrators can do
A major concern for Kubernetes administrators is managing and rationalizing cluster capacity, and we can leverage the Prometheus + Grafana dashboard and command line on the web to capture cluster utilization metrics for administrators to use.
But Kubernetes administrators also face a big thorny problem: running applications. Applications that solve a particular problem can be written in different ways by different developers, resulting in different performance (e.g. Java may consume more memory and Golang consumes relatively little memory). Every application is unique, and there is no one-size-fits-all approach. Administrators have less control over developers’ applications, and in large enterprises, it can be difficult for a single management team to reach a large number of development teams. Therefore, the focus of the administrator should be:Set up guardrailsto allow developers to adjust their own applications (within guardrails).
Configure LimitRange
After going around for so long, I finally got to the point.
To do this, administrators can configure different LimitRanges for each NameSpace, providing developers with recommended size limits for individual containers and pods. The following is an example of a LimitRange. Because each cluster and application has different business and risk requirements, the numbers will vary for each reader in practice.
1 | |
A good practice for developing in Kubernetes is to create microservices applications rather than large boulder applications. To encourage the development of microservices, limits should be applied to constrain the maximum size of a pod. The physical capacity of a node may determine this maximum size, as it should be able to easily accommodate several of the largest pods. Still like this figure:
Let’s continue with the LimitRange example above. The minimum pod and container size may be determined by the needs of the running application and does not have to be enforced by the administrator. For simplicity, we also encourage developers to run a container on each pod (a typical exception is to use sidecar containers like Istio’s sidecar). Therefore, the example above uses the same resource values for both pods and containers.
The default requests and limits are the developer’s suggested values. Workload resources (that is, pods) that do not explicitly declare the size of the container inherit the default value。 As a good practice, developers should clearly define resource requests and limits in workload resources instead of default values.
CPU and memory maxLimitRequestRatio is a burst guideline for developers. In a development environment, a high CPU maxLimitRequestRatio works well when prototype applications are often running idle, but require reasonable on-demand resources when used. Developers might only work during business hours, code offline in their own IDE, occasionally test individual microservices, or test different stages of a CI/CD pipeline. In contrast, if many end users access the application at the same time throughout the day, you will see higher baseline utilization. This may be closer to your production environment and may lower the maxLimitRequestRatio (possibly the request limit for event 1:1). Because different utilization patterns at each stage of the pipeline will result in different requests and throttling, it’s important to test with a simulated workload to determine the appropriate unit size before production.
Developers will use maxLimitRequestRatio as a guideline for proper sizing. The Kubernetes scheduler makes scheduling decisions based on resource requests, so developers should configure resource requests to reflect actual usage. Then, based on the risk profile of the application, the developer configures limits to comply with the maxLimitRequestRatio. An administrator who sets maxLimitRequestRatio to 1 forces developers to configure requests to equal limits, which may be ideal in production to reduce risk and prioritize stability.
Earlier in this article, we compared memory and CPU and described the different behavior of these two resources under load, with high memory causing pods to be evicted or restarted from out-of-memory situations. Therefore, it is best to proceed with caution and configure a lower maxLimitRequestRatio for memory in different environments to prevent application pod restarts. There are other things you should be aware of when configuring memory for OpenJDK pods. (if the corresponding dynamically adjusted parameters are not configured), the JVM heap inside the container and pod is not aware of the container’s requests and limits, but the resource constraints applied to the former will affect the latter.
Configure the ResourceQuota
Administrators can also configure ResourceQuotas, which provide capacity-based limits for NameSpace to guide developers in sizing applications based on predicted estimates. The following is an example of a ResourceQuota.
1 | |
During the initial creation of an application NameSpace, the development team should work with administrators to predict their application size and apply appropriate quotas. Administrators should forecast application size based on services, number of replicas, and estimated size of pods. To simplify the management of many NameSpaces, administrators can consider an AWS-like approach as a starting guideline, where small, medium, large, xlarge applications are given corresponding predetermined quotas.
Applications run across stages of the CI/CD pipeline, each in a different cluster or NameSpace and with its own configured quota. In development and testing NameSpace without considering performance and high availability, applications should be configured with minimal pods and 1 pod copy per service to reduce resource usage. On the other hand, in a production cluster or NameSpace, larger pods and at least 2 unit copies per service should be used to handle higher traffic and provide high availability. By using simulated workloads in a CI/CD pipeline for stress and performance testing, developers can determine the appropriate production pod size, number of replicas, and quotas before production release.
Administrators should budget for quotas for future scaling and consider the application’s usage patterns, peak capacity, and autoscalers for configured pods or nodes, if any. For example, you can allocate additional quota in a development NameSpace that quickly adds new microservices, a performance test NameSpace to determine the appropriate production pod size, or a production NameSpace that uses HPA to adjust peak capacity. Administrators should provide sufficient quota overhead for each of these and other scenarios while balancing the risk of infrastructure capacity and protecting infrastructure capacity.
Both administrators and developers should expect quota adjustments over time. Developers can reclaim quotas without the help of an administrator by looking at each service and reducing pod requests or limits to match actual usage. If the developer has already taken these steps but still needs additional quota, then they should contact the administrator. Administrators should use the developer’s periodic quota request as an opportunity to analyze actual consumption based on previously forecasted estimates and confirm or adjust quota sizes and new forecast estimates accordingly.
It also describes some minor considerations when sizing quotas. When determining the quota ratio for CPU and memory, you should consider node capacity so that you can make effective use of both. For example, an AWS EC2 instance of type m5.2xlarge is 8 vCPUs with 32 GiB of RAM. A cluster of m5.2xlarge nodes can allocate application quotas at a ratio of 1 vCPU per 4 GB of RAM (System reserved space for nodes is not considered), resulting in efficient use of CPU and memory. If your application workload (that is, CPU or memory intensive) does not match the node size, you can consider using a different node size.
There has been a debate among administrators about when to apply and not apply CPU limits for quotas, and here we will provide some considerations rather than formal guidance. As we discussed earlier, a pod’s lack of CPU causes throttling, but not necessarily pod termination. If administrators tend to overcommit and utilize all available CPU on the node, they should not set CPU limits for quotas。 Instead, set CPU limits for resource quotas to reduce overutilization and application performance risksThis may be a business and cost decision, not a technical one. Development environments can tolerate higher risk and unpredictable performance than production environments, so administrators can consider themApply CPU limits to production instead of development。
Finally, in some special cases, applying quotas is not recommended. The purpose of applying quotas is to give administrators a degree of control over capacity planning for custom-developed applications. Quotas should not be applied to components of Kubernetes itself, as these projects require a pre-configured amount of resources. For similar reasons, quotas should not apply to Enterprise applications from third-party vendors.
summary
In this article, we looked at how the Kubernetes platform secures the architecture with resource constraints, including:
- Requests and limits for pods
- Resource allocation for Node
- NameSpace level LimitRange for pods and containers
- NameSpace level ResourceQuota
It also provides reasonable adjustment considerations when applying the protections of limits and quotas in the application NameSpace. The risk appetite of each application and the capacity of the Kubernetes cluster are different, and need to be considered comprehensively before implementation.