Rancher series of articles - Install a highly available Rancher cluster on Tencent Cloud's K3S
This article was last updated on: February 7, 2024 pm
Opening
📜 introduction:
- A threesome will have my master
- Knowledge sharing, the world for the public
scheme
Install Rancher on Tencent Cloud’s K3S
Programme objectives
- High availability
- 3 master k3s clusters
- Rancher in high-availability mode
- Data backup
- Rancher data is backed up to Tencent Cloud Object Storage COS
- Secure encryption
- There can be no http, all https
- Customer-facing
- Public network accessibility;
- Domain name accessible;
- Official certificate
- Reuse the capabilities of the public cloud as much as possible
- ~~Tencent Cloud Controller Manager~~ (❌ Because Tencent Cloud has given up maintaining the relevant source code, it cannot be reused)
- ~~SVC LoadBalancer calls CLB~~ (❌ Because Tencent Cloud has given up maintaining the relevant source code, it cannot be reused)
- CLB - Uses a 4-layer CLB
- Backup - Use Tencent Cloud COS
Prerequisites
-
If you have a Tencent Cloud account, the account has at least the following permissions:auto k3s installation - Set up CAM and these permissions:
QcloudTAGFullAccess
-
The Tencent Cloud account has the corresponding API key and address:Access Keys - Console (tencent.com) , or have the relevant permissions:
cam:QueryCollApiKeyandcam:CreateCollApiKey -
An object storage pass cos for backup
-
Rancher’s domain name
-
Rancher’s domain name certificate (if not, try to automatically generate a free certificate via cert-manager and let’s encrypt)
Notes
Rancher installation considerations
-
Adjustments are required before installation:
- Security groups
-
After installation, you need to configure:
- LB
- Backup
-
⚠️ Paid model, COS adjusts the payment model as needed.
Installation steps
Rancher
🚩 Important:
Install via Helm Chart
Rancher port requirements
📚️ Quote:
Inbound rules for Rancher Server nodes
| Agreement | Port | Source | Description |
|---|---|---|---|
| TCP | 80 | Load balancer/proxy, which is an external SSL termination Rancher UI/API | when terminated using external SSL |
| TCP | 443 | Server Node Agent Node hosted/registered Kubernetes for any source that needs to be able to use the Rancher UI or API Rancher agent, Rancher UI/API, kubectl | |
| TCP | 6443 | K3s server node | Kubernetes API |
Finally, the specific security group configuration is as follows: (It should be possible to tighten further)

Rancher is a highly available installation
Install the helm chart first and create ns:
1 | |
The SSL options are:Existing certificates, install Rancher via Helm:
📚️ Quote:
Depending on the SSL option you choose, install Rancher through Helm
Add the certificate to the k8s secret first:
1 | |
1 | |
The output after running is as follows:
NAME: rancher
LAST DEPLOYED: Sat Feb 12 20:10:14 2022
NAMESPACE: cattle-system
STATUS: deployed
REVISION: 1
TEST SUITE: None
NOTES:
Rancher Server has been installed.

NOTE: Rancher may take several minutes to fully initialize. Please standby while Certificates are being issued, Containers are started and the Ingress rule comes up.

Check out our docs at https://rancher.com/docs/

If you provided your own bootstrap password during installation, browse to https://<your-rancher-domain> to get started.

If this is the first time you installed Rancher, get started by running this command and clicking the URL it generates:

echo https://<your-rancher-domain>/dashboard/?setup=$(kubectl get secret --namespace cattle-system bootstrap-secret -o go-template='{{.data.bootstrapPassword|base64decode}}')

To get just the bootstrap password on its own, run:

kubectl get secret --namespace cattle-system bootstrap-secret -o go-template='{{.data.bootstrapPassword|base64decode}}{{"\n"}}'

Happy Containering!
🔥 Notice:
Note that the 443 permission of the Rancher domain name must be enabled.
ℹ️ Info:
- To install a specific version of Rancher, use
--versionFlags, such as:--version 2.3.6。
After that, access the UI for initial password setting and other work.
🎉 At this point, the Rancher high-availability cluster installation is complete.
Rancher China optimizes configuration
Refer here:
Finishing touches
Adjust the security group
Inbound rules:
- TCP:22 (SSH) port permissions are tightened
- TCP:6443 (K8S API) Port permissions are tightened
- UDP: 8472 (K3s vxlan) is only open to intranets
- TCP:10250 (kube api-server) is only available to intranets
The end effect is as follows: (should be able to tighten further)
Configure LB
📚️ Quote:
We recommend configuring the load balancer as a Layer 4 equalizer that forwards normal 80/tcp and 443/tcp to the Rancher management cluster nodes. The Ingress Controller on the cluster redirects http traffic on port 80 to https on port 443.
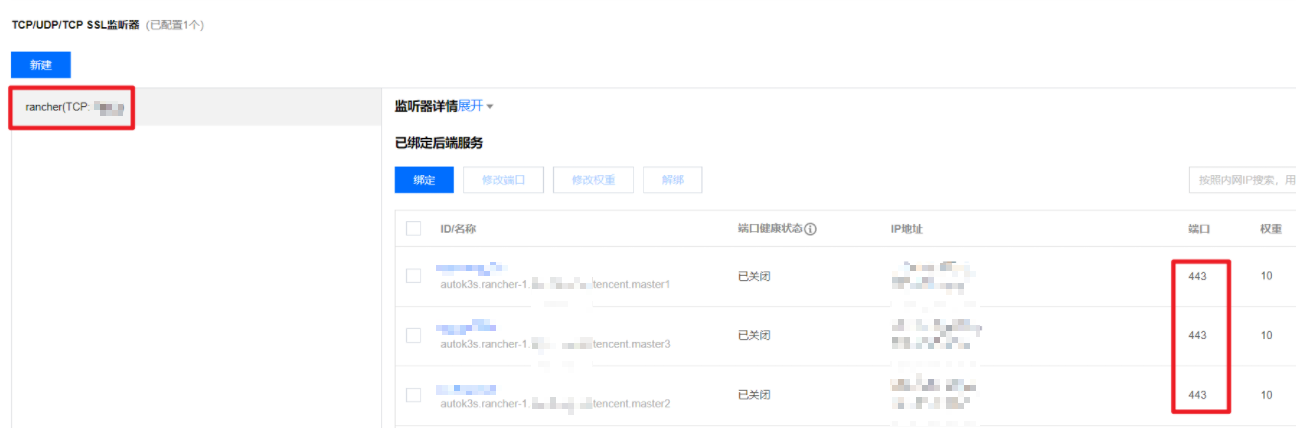
如上面所述,所以通过 4 层 LB, 将 443/tcp 转到后端。如下图:
配置 Rancher Backup
📚️ Quote:
通过 UI 安装:
先创建 cos 存储的认证信息 Secret:
1 | |
然后在 应用市场 选择 Rancher Backup 安装:

配置 对象存储:

安装成功日志如下:
helm upgrade --install=true --namespace=cattle-resources-system --timeout=10m0s --values=/home/shell/helm/values-rancher-backup-crd-2.1.0.yaml --version=2.1.0 --wait=true rancher-backup-crd /home/shell/helm/rancher-backup-crd-2.1.0.tgz
...
---------------------------------------------------------------------
SUCCESS: helm upgrade --install=true --namespace=cattle-resources-system --timeout=10m0s --values=/home/shell/helm/values-rancher-backup-crd-2.1.0.yaml --version=2.1.0 --wait=true rancher-backup-crd /home/shell/helm/rancher-backup-crd-2.1.0.tgz
---------------------------------------------------------------------
helm upgrade --install=true --namespace=cattle-resources-system --timeout=10m0s --values=/home/shell/helm/values-rancher-backup-2.1.0.yaml --version=2.1.0 --wait=true rancher-backup /home/shell/helm/rancher-backup-2.1.0.tgz
...
---------------------------------------------------------------------
SUCCESS: helm upgrade --install=true --namespace=cattle-resources-system --timeout=10m0s --values=/home/shell/helm/values-rancher-backup-2.1.0.yaml --version=2.1.0 --wait=true rancher-backup /home/shell/helm/rancher-backup-2.1.0.tgz
---------------------------------------------------------------------
配置 *Backup*, 如下:
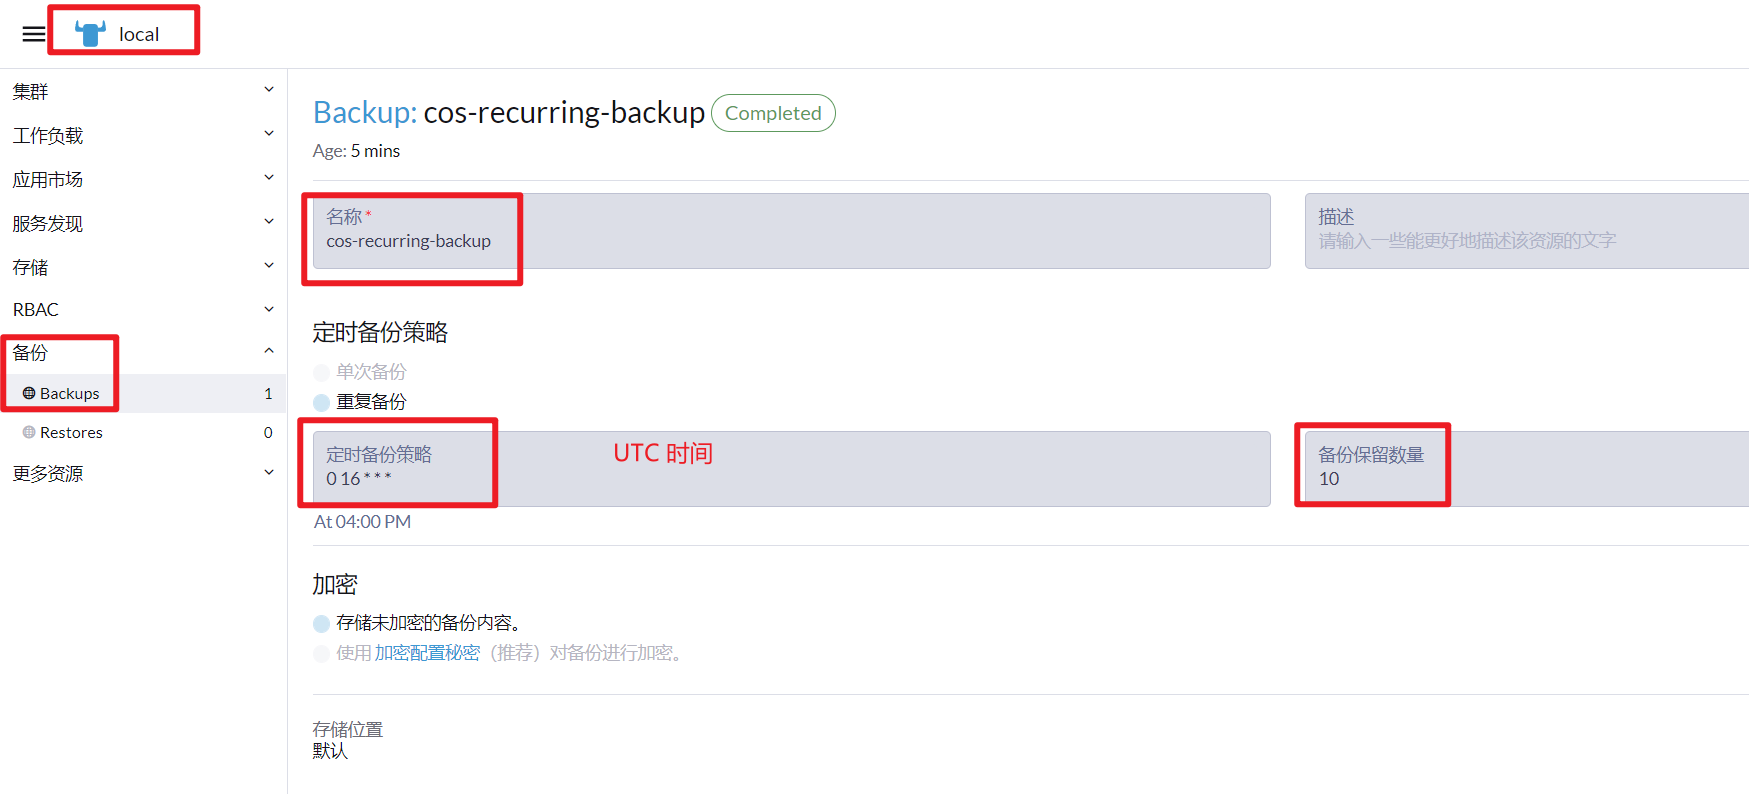
🎉 登录 COS 发现已经成功 Backup。
## 总结
🎉🎉🎉 至此,完成腾讯云上 K3S 高可用集群 及 Rancher 高可用集群的搭建,并配置 Backup。
以下是安装的相关信息:
### K3s
1. 3 个 Master 和 Server 地址
2. K3S API Server 地址:`https://<3 个 master IP 地址任一个 >:6443` (6443 端口目前没有配置 CLB)
3. K3S kubeconfig 配置:位于 k3s 的 `/etc/rancher/k3s/k3s.yaml` 以及操作机的 `/root/.autok3s/.kube/config`
### Rancher
1. 地址:
1. 公网访问:`https://<your-rancher-domain>:<port>/`
2. 内网访问:`https://<your-rancher-domain>:443` (需要编辑自己电脑的 `hosts` , 将 3 个 master 任一内网 IP 映射到该域名)
2. 账号:`Admin`
3. 密码
### 安全组
使用的安全组,最终配置如下:(应该可以进一步收紧)

### CLB
使用的 CLB
监听器为:`rancher(TCP:<port>)` 转到 3 台 master 的 443 端口。
### Backup COS
K3S 和 Rancher 都配置了 Backup,Backup 到对象存储 cos 中。具体的地址为:
1. 桶:rancher-backup-<cos-id>
2. 域名:`https://rancher-backup-<cos-id>.cos.ap-shanghai.myqcloud.com`
3. S3 Endpoint: `cos.ap-shanghai.myqcloud.com`
4. 文件夹为:
1. k3s 为:`/rancher-1/rancher/rancher`(Backup 策略:每天 0 点 Backup,保留 5 份)
2. rancher 为:`/rancher-1/rancher/k3s` (Backup 策略,每天 0 点 Backup)
5. COS 生命周期为:自动清理 1 个月前的文件。(配置 [自动清理规则](https://console.cloud.tencent.com/cos/bucket?bucket=rancher-backup-1258988025\®ion=ap-shanghai\&type=basicconfig\&anchorType=lifeCycle))